I Love steam buns so much that I had tried so many times in the past to make them myself, but there was always something missing and I didn’t know why. Recently I’ve tried different recipes and asked people so many questions, and today I made my best steam buns ever. Here is my recipe, hope you will like it too.

All-purpose flour 500g
Water 280g
Sugar 1tbsp
Rapid rise instant yeast 5g
Pork filling:
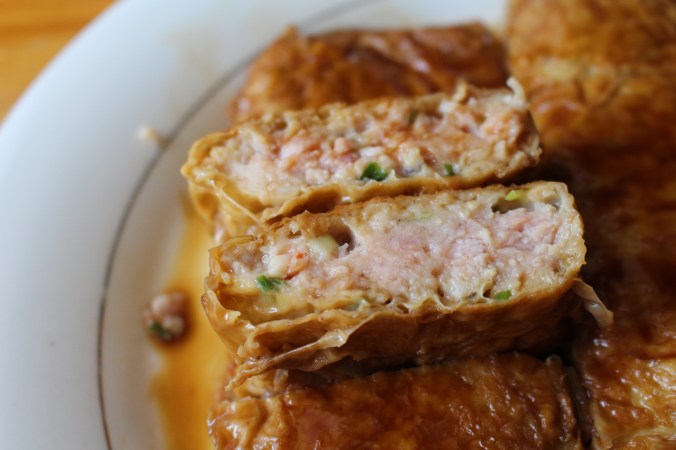
Pork belly 430g
Light soy sauce 1.5 tbsps.
Dark soy sauce 2 tbsps.
Cooking wine 1tbsp
Chicken bouillon 1/2tsp
Scallion ½ cup (finely chopped)
Mix everything together and marinate for a couple of hours.

Beef and cabbage filling:
Ground beef 70g
Cabbage 150g (finely shredded)
Carrot 2tbsps. (finely shredded)
Chinese Dried mushroom a few pieces
Salt 1/3 tsp
Chicken bouillon ¼ tsp
Sesame oil 1 tsp
Chinese vermicelli 10g
Soak the dried mushroom in water until soften. All vegetables need to be finely shredded, thin and short. Bring some water to boil, and cook cabbage in the boiling water for a minute. Also cook the vermicelli in boiling water for 15 seconds, then cut them really short. Squeeze all the water out of cabbage, and then mix with the rest of ingredients.

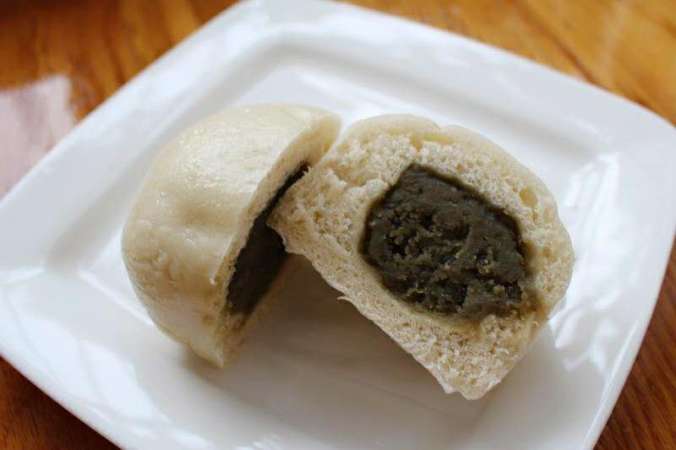
Red bean paste filling:
Red bean 225g
Water 2 cups
Sugar 250g
Vegetable oil 45g
Glutinous rice flour 15g + 3tbsps water (mix well)
Salt 1/3 tsp.
Soak the red bean in water overnight.
Cook the red bean and water in a pressure cooker for 7 minutes.
After the bean is cooled, pour it to a blender and blend until smooth.
Cook the bean paste in a cooking pan with the rest of ingredients until it is in thick paste condition, about 20-30 minutes. when it is ready, the bean paste will become whole big piece and not stick to the edge of the cooking pan.
You can do the same for the bean with green tea powder filling, only you need to an additional ingredient of 1tbsp of green tea powder that is mixed with 2 tbsps. of water, mix it with the rest ingredients.

Direction:
Mix all the ingredients for Bun dough together in a bread machine and turn the dough cycle on. The dough cycle is 90 minutes in total.
Once the time is up, usually it is twice in size, it is good. The time will vary depend on the weather temperature. If you don’t have a bread machine at home, you can use a mixer to mix the dough for 15 minutes, then let it rise in room temperature until it is twice in size. If you have none of them, you still have your hands, use your own hands to knead the dough until it is smooth (I think it should be about 5 minutes)
Once the dough is twice in size, take it out of the bread machine, knead it by hand for another 5 minutes (you can use machine to do it too). Cut the dough into 10 to 12 even pieces, use a dump cloth or wet kitchen towel to cover them up, take one piece of the dough, use a rolling pin to roll it out to a big flat round piece that is thin on the edge but thick in the center.
Place a spoonful of fillings in the center of dough wrapper. Use one hand’s thumb to secure it with your thumb pressing the filling lightly.
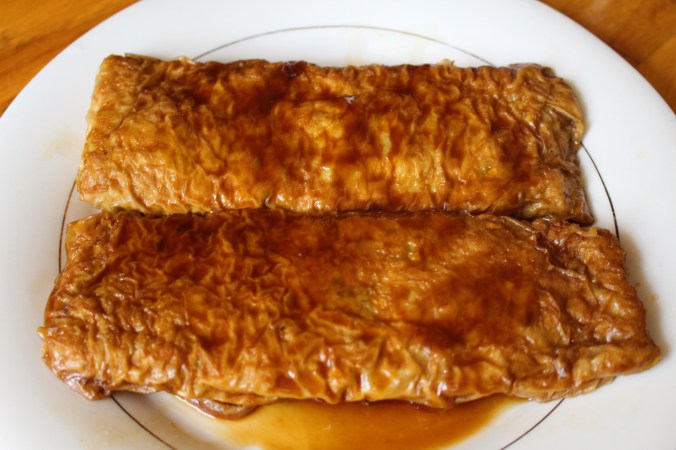
Use another hand, with your thumb and first index finger to pull up a little portion of the side of the dough. Fold and pleat evenly all the way as you go anticlockwise until you reach the end, enclose the bun. You’ll get a nice swirl pattern. You will need some practices to get to the perfect sharp, but it is not really that hard. I usually do Pleat for savory buns and smooth round surface for the sweet ones.
Once you finish pleating them, cut some parchment paper and seat them on top of the paper. Put them inside the bamboo steamer, let them seat for another 15 minutes, they will grow bigger again.
Bring some water to boil, steam them for 15 minutes.
DON’T OPEN THE LID OF THE STEAMER!!! Wait 5-10 minutes. If you open the lid right after you turn the heat off, the bun will shrink because of the colder air outside the steamer will heat the hot steaming buns.

![mmexport1510541032482_mr1510541101278[1]](https://caiqinchen.com/wp-content/uploads/2017/11/mmexport1510541032482_mr15105411012781.jpg?w=676)
![mmexport1510540919471_mr1510541115332[1]](https://caiqinchen.com/wp-content/uploads/2017/11/mmexport1510540919471_mr15105411153321.jpg?w=676)
![pt2017_11_12_21_46_45[1]](https://caiqinchen.com/wp-content/uploads/2017/11/pt2017_11_12_21_46_451.jpg?w=501&h=668)