Taiwan Style Pancake/台灣蛋餅

All purpose flour 300 g

Hot water 210 ML

Salt 2 pinches

Pork lard 1 tbsp

Scallion Optional

Heat up water to 65C degree

Add salt to the flour and mix, pour the hot water to the flour and use chopstick to mix them.

Knead the flour together to form a dough ( check the temperature before doing it, it can be hot)

Cover the dough with a damp cloth and let the dough rest for one hour.

Cut the dough into 4-6 even pieces.

Take one and roll it out to a thin pancake with a rolling pin, spread a little bit of pork lard over the surface of the pancake. You can add the thin sliced scallion now if you want it to have scallion flavor. ( I make one with Asian basil really good).

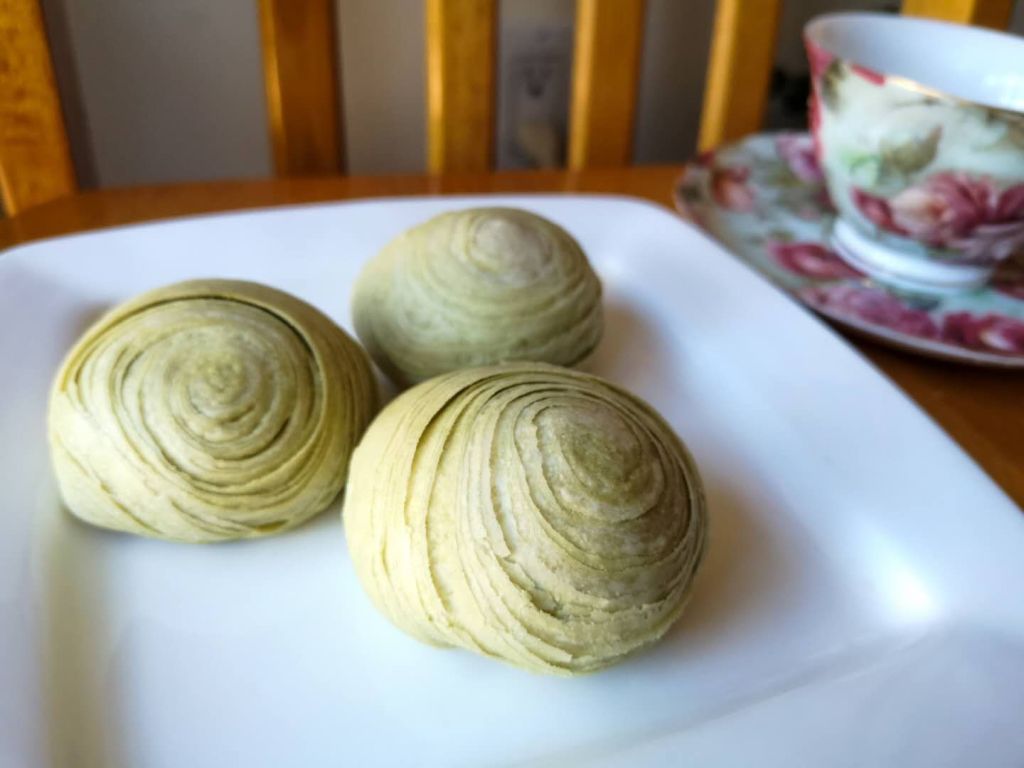
Please see below pictures on how to roll it up to make a pancake.

Add a tiny bit of oil in a non stick pan and pan fry the pancake until the color turns clear with a little bit of golden brown color on the surface.

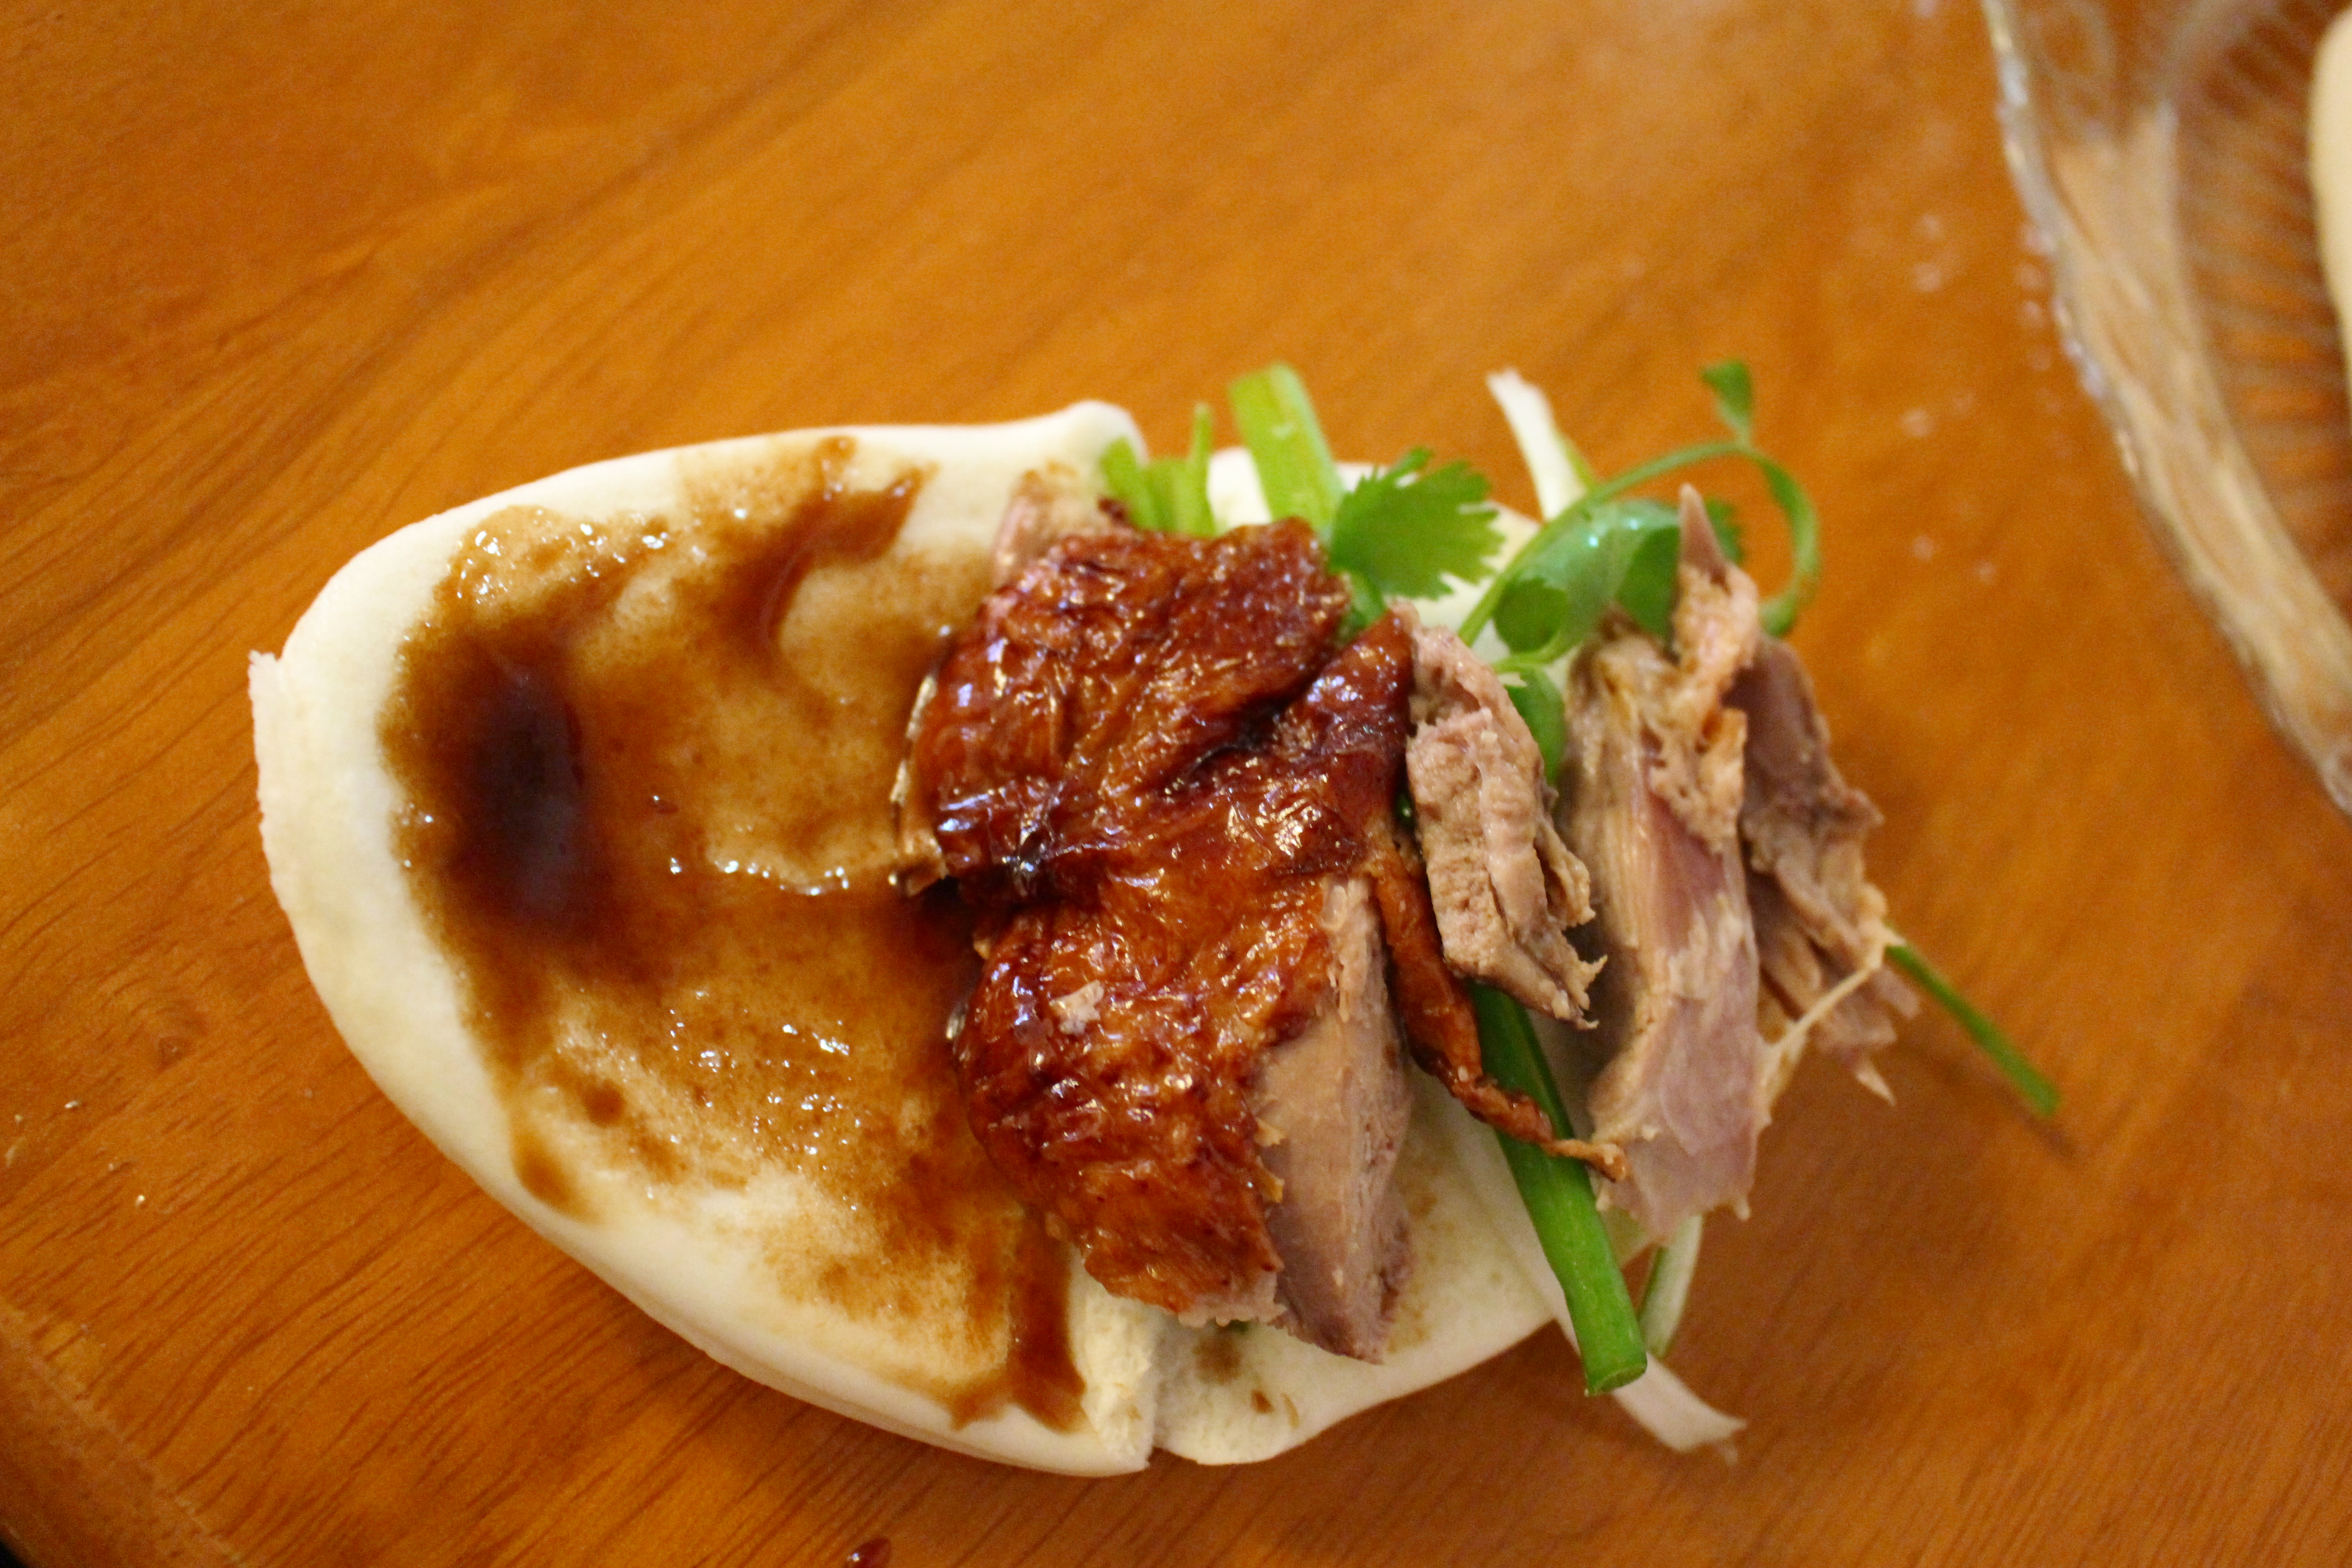
You can eat the pancake just like that, or make a egg pancake by adding an egg to the pan, then add the cooked pancake to the wet egg and pan fry for 2 minutes. Or to be really fancy like to picture above, add cheese, vegetables, ham or anything else you would like to eat with it. Be creative!!!

麵粉 300 克

熱水 210 毫升

鹽 2小撮

豬油 1 湯匙

葱花(可不要)

將水加熱至65攝氏度

在麵粉中加入鹽並混合,將熱水倒入麵粉中,用筷子混合攪拌。

揉麵粉在一起成麵糰(做之前要檢查一下溫度,會很燙的)

用濕布蓋住麵糰,讓麵團發酵一小時。

把麵團切成4-6個均勻的小麵糰。

拿一個出來然後用擀麵杖擀出一個薄煎餅,凃上一點點豬油在煎餅的表面。如果您希望它有蔥味,現在可以加點蔥花。(我加羅勒做一個非常好吃) 。

請參閱下面的圖片,瞭解如何捲起它做成煎餅。

麵糰擀薄后在加了一點油的不沾鍋裏煎到透明帶點金黃就可以吃了。 就這麽吃也可以, 或者加個蛋。 打蛋倒進鍋裏,馬上拿已經煎好的餅放上去蛋煎熟了就可以吃了。 也可以像我上面圖片裏一樣加你自己喜歡吃的東西卷起來更好吃。

Taro Dessert/芋頭酥

Ingredients 食材:

1. Water dough 油皮:(8个油皮面團)

150g All purpose flour 中筋面粉

30g Sugar 糖

60g Water 水

55g Pork lard 豬油

2. Oil dough 油酥: (8个油酥)

120g all purpose flour 面粉

4g Matcha powder 抹茶粉

65g pork lard 豬油

Taro fillings 芋頭馅儿:

600g taro 芋頭

Steam taro over boiling water until fork tender. /隔水蒸熟芋頭。

Add 50g of pork lard and 75g of sugar to the raro and mix well. (adjust the sugar according to your own taste)/加50克豬油和75克糖到芋頭裏攪拌均匀。(根據自己喜好增減糖的量)

Mix the ingredients for water dough and oil dough separated in two different containers.

After mix the water dough, knead it for at least 20 minutes like how we wash clothes. If you have a kitchen aid stand mixer at home it will be a great help.

Cover both dough with plastic wrap and let rest for 30 minutes.

Cut both into 8 even pieces, get one piece of water dough and use a rolling pin to roll it out and get one piece of oil dough and put in the center of the water dough and wrap it up like picture 2 below.

Roll the balls out to the oval sharp like picture 3 below.

Roll up the oval sharp dough and let rest for 20 minutes.

After 20 minutes, roll it again to the long strip like picture 6.

Roll the long strip up again and let rest for another 20 minutes.

After 20 minutes cut each roll into 2 even pieces like picture 10.

Flip the cut side up and use your palm to press it then use your rolling pin to roll it like when you make dumpling wraps (edge thinner than the center).

Add the evenly divided taro dough in the center of the wrap with the cut side down and wrap it up like picture 11 below.

將油皮面團和油酥的配料在兩個不同的容器中混合好。

混合好油皮面團后,搓揉至少20分鐘,就像我們洗衣服一樣。如果你有一個廚房攪拌機在家裡就用它代勞吧。

用塑料薄膜裝蓋住兩個麵糰,休息30分鐘。

把兩個麵糰都切成8個均勻的小團,將一塊油皮麵團用擀麵杖擀開, 放個油酥在上面包起來就像下面的圖片2。

把包起來的球擀開成橢圓形像下面的圖片3。

捲起橢圓形的麵糰,休息20分鐘。

20 分鐘后,再次擀開變長條形像圖片 6 。

再次捲起長條,讓休息20分鐘。

20分鐘后,將每個卷從中間切成2個一樣的大小像圖片10。

翻轉過來切面向上用你的手掌按壓它,然後用擀麵杖擀開像擀餃子包一樣中間厚邊緣薄。

放一塊均勻分劃好的芋頭在麵團上切面向下,然後像下面的圖片 11 一樣包裝起來。

Preheat the Oven 165°C(330℉)baking for 25 minutes 烤箱预热165°C(330℉)烤25分钟

Roast Duck Buns/烤鸭夹包

IMG_5036

I bought this roast duck from Costco the other day and it was surprisingly good. I didn’t expect prepackaged duck can be this delicious. It was so tender and juicy! The package was 2 half ducks, after I ate the first half with the orange sauce that comes with it, I didn’t feel like to eat the other half with the sauce again because the sauce was too sweet for me. So here is how I ate my other half: roast duck with steam buns. It was even better!!!

Heat up the duck and steam buns as directed on the packages, chop up some scallion and cilantro, get some hoisin sauce. And here you go: yummy delicious dish with only 15 minutes to prepare.

IMG_5047

IMG_5034

IMG_5043IMG_5035


IMG_5045


Air Fried Hot Wings/空气炸锅辣鸡翅

I made this spicy wings today and it is soooooo goooood!!! It is so easy to prepare also healthy since it is air fried.

IMG_5331

Chicken wing 1 pound (middle part only)

Light soy sauce 3tbsps

Roasted pineapple Habanero 1tbsp (optional)

Brown sugar 2tbsps

Honey 1 tbsp

Sriracha hot sauce 1tbsp

Minced Ginger 1tsp

Garlic 1tsp

Hoisin sauce 1tsp

Mix all the ingredients for sauce together and mix well.

Pour half of the sauce to the wings and marinate over night. Stir the wings once to make sure each piece get marinated evenly.

Cook the rest of sauce in a sauce pan with medium low heat until it is thicken about 4 minutes.

Air fried wings with 385F degree for about 15 minutes or until the juice running out or wings is clear.

Pour the wings to a mixing bowl and add the sauce to it and mix well.


鸡中翅1磅

生抽3汤匙

烤菠萝甜酱 1汤匙 (可选)

红糖2汤匙

蜂蜜1汤匙

越南辣酱1汤匙

生姜碎1茶匙

大蒜泥1茶匙

海鲜酱1茶匙

将所有酱汁的原料混合在一起, 搅拌均匀。

把一半的酱汁倒在翅膀里腌制一晚。中间搅拌翅膀一次, 以确保每一块都腌制均匀。

将剩下的酱汁放入锅中用中小火煮至浓稠约4分钟。

空气炸锅炸翅膀385华氏度约15分钟或直到鸡翅中的汁水流出是透明无血水的。

把翅膀倒在碗里, 加入酱汁, 搅拌均匀。


Air Fried Thai Flavor Wings/空气炸锅泰式鸡翅

Today is a game day, so I decided to make some wings. This is a bomb! I can’t believe how good it is! It has so many different flavors, layer after layer, just when you feel the sweet and savory at the first bite, you also feel the lemongrass fragrance dancing at the tip of your tongue; and you cant wait and take another bite, you receive the tiny sour flavor from the lime juice. This savory flavor is unlike any other because the saltiness from the fish sauce is definitely a kick!

IMG_5336

Chicken wing 1 pound (middle part only)

Sweet Thai chili sauce 2tbsps

Brown sugar 2 tbsps

Light soy sauce 2tbsps

Dark soy sauce 1tbsp

Rice vinegar 2tbsps

Fish sauce 1tbsp

Lime juice 1 tbsp

Lemongrass 1tbsp

Garlic 1tsp

Mix all the ingredients for sauce together and mix well.

Pour half of the sauce to the wings and marinate over night. Stir the wings once to make sure each piece get marinated evenly.

Cook the rest of sauce in a sauce pan with medium low heat until it is thicken about 4 minutes.

Air fried wings with 385F degree for about 15 minutes or until the juice running out or wings is clear.

Pour the wings to a mixing bowl and add the sauce to it and mix well.


鸡中翅1磅

泰国甜辣椒酱2汤匙

红糖 2汤匙

生抽2汤匙

老抽1汤匙

白米醋 2汤匙

鱼露1汤匙

青柠檬汁1汤匙

香茅1汤匙

大蒜1茶匙

将所有酱汁的原料混合在一起, 搅拌均匀。

把一半的酱汁倒在翅膀里腌制一晚。中间搅拌翅膀一次, 以确保每一块都腌制均匀。

将剩下的酱汁放入锅中用中小火煮至浓稠约4分钟。

空气炸锅炸翅膀385华氏度约15分钟或直到鸡翅中的汁水流出是透明无血水的。

把翅膀倒在碗里, 加入酱汁, 搅拌均匀。


Chinese Savory Pumpkin Rice Cake/南瓜年糕

IMG_5299

Rice flour 200g

Water 2.5 cups (including the water to soak mushroom and scallop)

Shredded Pumpkin 200g

Dried mushroom 4 pieces

Bacon 3 pieces

Scallion 2tbsps

Dried scallop 4tbsps

Shallot 2 tbsps


Soak dried mushroom and scallop in water for at least 1 hour.

Tear scallops into small pieces, dice mushroom. Cut bacon into small pieces too.

Add 1.5 cups water to the rice flour and mix well.

Add 2 tbsps. cooking oil in a skillet then add bacon, scallop, shallot and mushroom saute  for 2 minutes. Add 1tsp salt, 1/2 tsp white pepper and 1/2 tsp chicken bouillon to it and mix well.

Add pumpkin to the pan and continue to saute for 2 more minutes, add the water used to soak mushroom and scallop( about 1 cup) and continue to cook a minute.

Pour the rice flour and water mixture to the pumpkin mixture, turn the heat to medium and continue to stir until the mixture becomes solid. Turn the heat off.

Grease a 8″ tin foil pan and add a piece of parchment paper on the bottom, pour the rice flour mixture to it and smooth the surface.

Steam over boiling water for about 45 minutes.

When it cools down, you can save it in refrigerator for up to 2 weeks. when you want to eat it, cut into small pieces and pan fry them.

IMG_5286


粘米粉200克

水2.5 杯 (包括浸泡香菇和干贝的水)

南瓜丝200克

干香菇4片

培根3条

葱花2大勺

干贝4大勺

红葱头2大勺

香菇和干贝浸泡在水中至少1小时。

干贝撕成小块, 香菇切丁。把培根也切成小块。

在米粉中加入1.5 杯水, 搅拌均匀。

添加 2大勺油在平底锅里然后加入培根、干贝、红葱头和香菇炒2分钟。加入1茶匙盐, 半茶匙白胡椒和1/2 茶匙鸡粉 搅拌均匀。

将南瓜丝放入锅中, 再炒 2分钟, 加入浸泡香菇和干贝的水 (约1杯), 继续煮一分钟。

将米粉和水混合物倒入南瓜混合物, 将火转中火, 并继续搅拌, 直到混合物变成固体。把火关掉。

一个8英寸的锡箔盘刷层油并加入一张烤纸在底下, 倒入米浆混合物, 表面抹光滑。

隔滚水蒸大约45分钟。

当它冷却下来, 你可以把它冷藏在冰箱里2周时间。当你想吃的时候, 把它切成小块, 平底锅煎一下就好了。

Flavored Mochi/糯米糍

Since last time I made mochi, I always wanted to do it with different flavors. So this time I made some red bean paste as filling and made 3 different flavors: green tea, peanut meal and coco. They are all really good!!!

IMG_1236

Here is the recipes for red bean paste filling:

Red bean 225g

Water 2 cups

Sugar 250g

Vegetable oil 45g

Glutinous rice flour 15g + 3tbsps water (mix well)

Salt 1/3 tsp.

Soak the red bean in water overnight.

Cook the red bean and water in a pressure cooker for 15 minutes.

After the bean is cooled, pour half of it to a blender and blend until smooth.

Cook the bean paste in a cooking pan with the rest of ingredients until it is in thick paste condition, about 20-30 minutes. when it is ready, the bean paste will become whole big piece and not stick to the edge of the cooking pan.

The other half just use a potato smasher to smash it a little. then mix it with the other half that is already in paste form. I like some different texture in the filling, so I want some chunk red bean mix in it.

Here is the link to how to make mochi

https://caiqinchen.com/2018/06/27/peanut-mochi-%e8%8a%b1%e7%94%9f%e7%b3%af%e7%b1%b3%e7%b3%8d/

Make small size red bean paste balls.

Divide the flour dough into even size balls too.

Wrap the red bean paste inside the flour dough then cook in boiling water.

Wrap the cooked balls with the green tea powder, coco powder or peanut meal. ( don’t wrap them with too much of coco powder or green tea powder, they can be bitter)

Tips:

Mochi dough is very sticky, so it is extremely hard to shape them. It is very important to get a pair of gloves when you are working on them. Also add some Cooking oil to the dough will help to make the work easier too.

IMG_1243

IMG_1261

IMG_1269.JPG

Purslane Pork Buns/马齿苋肉包

IMG_1174

IMG_1189

I  just recently discovered this amazing vegetable: purslane. I don’t know if this is familiar to everyone, but I do see Mexican people are eating it. I went to farmer’s market yesterday and I saw they sold it for $2 a big bunch. I bought 2 bunches home and decided to use some of them to make steam buns. This vegetable has a hint of sour taste in it, and it is perfect for summer.

Here is the link for how to make the bun dough:

https://caiqinchen.com/2017/09/24/steam-buns%e5%8c%85%e5%ad%90/

Stuffing:

Purslane 500 g

Pork belly 200 g

Soy paste 1 tbsp

Soy sauce 2 tbsps

Sugar 1.5 tbsps

Cooking wine 1.5 tbsps

Chicken bouillon 1 tsp

Sesame oil 1/2 tbsp

Dice the pork into small pieces, add the soy paste, chicken bouillon and cooking wine to it and marinate for at least 30 minutes.

Precook purslane in boiling water for 2-3 minutes, then rinse it with cold water. Squeeze as much water out of the vegetable as possible.

Chop the vegetable really fine. Add it to the pork, then add the rest of sauce/spices. Mix everything together.

WeChat Image_20180715200809

WeChat Image_20180715200740

WeChat Image_20180715200757

我最近才发现了这种神奇的蔬菜: 马齿苋。我不知道是不是每个人都熟悉它, 但我有看到墨西哥人卖它。昨天我去了趟农贸市场, 我看到他们卖2美元一大捆。我买了2捆回家, 决定用一些来做蒸包子。这种蔬菜带一种酸的味道, 夏天吃很完美。

下面是如何制作包子面团和包包子的链接:

https://caiqinchen.com/2017/09/24/steam-buns%e5%8c%85%e5%ad%90/

馅料:

猪肉200克

酱油膏1汤匙

酱油2汤匙

糖1.5 汤匙

料酒1.5汤匙

鸡精1茶匙

马齿苋500克

芝麻油 1/2 汤匙

将猪肉切成小块, 加入酱油、鸡精和料酒腌至少30分钟。

在滚水中 煮马齿苋2-3 分钟, 然后用冷水冲洗。尽可能的把蔬菜里的水挤出来。

把蔬菜切细后加到猪肉里, 然后加入其余的酱油/香料。搅拌在一起。

Wonton With Chili Sauce/红油抄手

I make wontons quite often because it is easy and can be stored in the freezer for later when I don’t feel like to cook anything or when I am all out of idea what to eat. I used to work in Chinese restaurant for years, so making wonton is something easy for me. I can make 50 wontons in 10 minutes. It is getting hot recently, and I don’t feel like to eat wonton soup anymore so I make this wonton with chili sauce for summer time.

IMG_0665

It is same way of wrapping wontons and cook the wontons in the boiling water just like when we make wonton soup. But after they are cooked, use a strainer to get them out of boiling water then add the chili sauce.

https://caiqinchen.com/2016/03/27/%e4%ba%91%e5%90%9ewonton/

Here is how to make the sauce:

Light soy sauce 1tbsp

Balsamic vinegar 1tbsp

Water 2 tbsps

Sugar 1tsp

Chicken bouillon 1/3 tsps

Hot oil 1-2 tsps

Mix everything above together and it is the sauce for wontons. It is for one serving about 12-15 wontons.

wechat-image_20180701174949.jpg

这是同样的方法包装馄饨和煮馄饨。但在煮熟后, 用漏勺把它们从沸水中捞出, 然后加入红油酱汁。

https://caiqinchen.com/2016/03/27/%e4%ba%91%e5%90%9ewonton/

下面是如何制作红油酱汁:

生抽1汤匙

香醋1汤匙

水2汤匙

糖1茶匙

鸡精 1/3 茶匙

红油 1-2 茶匙

把上面的东西混合在一起, 这是馄饨的调味汁。这是一份的量大约12-15 馄饨。

Cucumber Salad/凉拌小黄瓜

IMG_0171.JPG

Total $1.75

English cucumber 1

Sweet chili Sauce:

Thai sweet chili sauce 1tbsp

Water 2 tbsps

Sugar 2tsps

Rice Vinegar 1.5tbsps

Garlic 1 clove (minced)

Salt ½ tsp


Savory sauce:

Soy sauce 3tbsps

Shallot oil 1tbsp

Chicken Bouillon 1/2tsp

Balsamic vinegar 1tbsp

Garlic 2 cloves(minced)

Hoisin sauce 2tsp

Sugar 1/2 tbsp

IMG_0082

Mix the ingredients for sauce together and mix well.

Peel some of the skin off the cucumber to make it look prettier.

Cut 90 degrees straight down to 2/3 the wide of the cucumber on one side.

Turn the cucumber to the other side and cut 45 degrees tilted down to 2/3 the wide of the cucumber on the other side.

Pour 2-3 cups of water to a big bowl, add 2tsps salt and dissolve.  Leave the cucumber we just cut in the water for 15 minutes.

Get the cucumber out of salted water and gently squeeze the excess water.

Circle the cucumber in a plate the pour the sauce over it.

This is a super healthy and delicious dish for hot summer. You can make different kind of dressings for it. When you cut the cucumber, make sure don’t cut it through if you want to impress others. The first time when I made it, I cut it a little to thick so it didn’t look as pretty as the second one.

WeChat Image_20180527100525

总共$1.75美元

英国小黄瓜1条

甜酱:

泰国甜辣酱1汤匙
水2汤匙
糖2茶匙
米醋1.5汤匙
大蒜1粒 (碎)

盐½ 茶匙

咸酱:

酱油3汤匙

葱油1汤匙

鸡精1/2 茶匙

香醋1汤匙

大蒜2粒 (切碎)

海鲜酱2茶匙

糖1/2 汤匙

IMG_0169
把酱汁调味料混合在一起, 拌匀。

刮掉黄瓜上的一些皮, 使它看起来更漂亮。
在黄瓜的一面以90度直切黄瓜至2/3 的宽度。
把黄瓜转到另一边, 以45度斜切黄瓜到 2/3的宽度。
倒2-3 杯水到一个大碗里, 加入2茶匙盐搅拌溶解。 把黄瓜放在水里15分钟。
把黄瓜从咸水中取出, 轻轻地挤掉多余的水。
把黄瓜盘放在盘子里倒上酱汁。
炎炎夏日这是一个超级健康和美味的凉拌菜。你可以做不同的酱汁来陪它。当你切黄瓜的时候, 小小不要把它切断。我第一次做的时候, 我切的有点厚, 所以它看起来不如第二个那么漂亮。