Norwegian Poundcake

IMG_7927 IMG_0764

A friend of mine gave me this really delicious  pound cake recipe. Not too sweet and very moist. A small cup of  tea would be a perfect match with a piece of this.

1 cup butter

1 1/3 cup flour(sifted)

5 eggs

1/3 cup Powder sugar

1 1/3 cups sugar

1 1/2 tsp baking powder

1/2 tsp salt

1/2 tsp almond extra

Beat butter and flour for 5 minutes.  Add eggs one at a time at low speed.

Sift together sugar, baking powder and salt. Adding gradually to butter mixture

Add almond extra

Mix a minutes more after all sugar and almond extra has been added.

Pour mixture into a greased baking pan. Bake at 325F for 1 hour

Invert on cake rack.

When cool sprinkle with powdered sugar.

Chicken With Garlic Sauce/鱼香鸡

IMG_0779

材料:

适量胡萝卜,西芹和红椒切片,大蒜切碎,黑木耳,香菇泡发。

鸡胸肉半磅切片用小苏打加水浸泡15分钟后放水龙头下冲洗干净沥干加入盐,料酒,胡椒粉,淀粉拌匀备用。

取一个碗加入酱油3tbsp,耗油1tbsp,香醋3tbsp,糖3tbsp,鸡精少许,蒜头1tbsp,辣油1tsp,高汤1/3杯水淀粉搅拌均匀为调味汁备用。

炒锅倒油倒入鸡肉翻炒至变色盛出备用。

底油放入香葱姜末蒜末爆香,倒入胡萝和香菇卜翻炒,稍加一点水翻炒2分钟。接着把红椒,黑木耳加入翻炒均匀。 最后加入鸡肉继续炒一两分钟。把调好的料汁倒入翻炒均匀关火。

Ingredients:

Some sliced carrot, celery and red pepper,  black fungus and black mushroom,1tbsp minced garlic.

Half pounds of sliced chicken breast soak in a big bowl of water with 1/2tsp of baking soda for 15 minutes, rinse it under the running water for one minute then drain. Add salt, cooking wine, white pepper and corn starch to marinate it for another 15 minutes

In a bowl add 3tbsps of soy sauce, 1tbsp of oyster sauce, 3tbsps of vinegar, 3 tbsps of sugar, little bit of chicken powder, 1tbsp of garlic, 1tsp of hot oli and 1/3 cup of broth alone with some corn starch, mix well.

In a hot pan add oil and cook the chicken until they turn white then take them out of hot pan.

Add a little bit of ginger, garlic and scallion to the hot pan saute until aromatic. Add in carrot and black mushroom and cook for 2 minutes. Then the remaining vegetable and chicken and continue to cook for 1 to 2 minutes. Last add the ready to cook sauce until the sauce becomes bright and thick.

Similar way of cooking pork with garlic sauce, only this time that I shredded the ingredients.

IMG_8124 IMG_8128

Coke Flavor Chicken Wings/可乐鸡翅

IMG_0166

Ingredients/材料:

Chicken wings/鸡翅

Steam mix vegetables/水煮杂菜

A few pieces of ginger/几片姜

White rice/白饭

Cooking/煮法:

Use toothpick to poke some holes on the back of the wings, marinated the wings with ginger, salt and cooking wine for at least 30 minutes. 用牙签在鸡翅背后扎些孔,用盐,姜和料酒腌渍鸡翅至少30分钟。

Add oil to a hot non-stick pan, pan fried each side of wings until golden brown then add in oyster sauce, soy sauce, coke, and ginger. With medium high heat cook for 15 minutes, then turn the heat down to medium low and cook for another 10-15 minutes. Serve it with rice and steam mix vegetables. It will be a good idea if you have some sauce over the rice.  / 加油在热的不粘锅里,把鸡翅俩面都煎一煎。接着加入耗油,酱油,可乐和姜中火煮15分钟,接着小火再煮10-15分钟。摆盘加白饭与水煮的杂菜就可开吃了。

Fried Rice/炒饭

IMG_0201

Ingredients/原料:

1/3 cup of peas, corn and carrot mix/1/3杯的青豆,玉米和萝卜

A few pieces of thin sliced fatty beef (normal used for hot pot)/几片的肥牛

A few pieces of shrimps marinated with salt, cooking wine and white pepper/几只虾用盐料酒和白胡椒腌一下

2 eggs/ 两只蛋

One bowl of overnight rice/一碗隔夜饭

1 tbsp. of thin chop scallion/一点葱花

Cooking/做法:

Precook shrimps and beef in boiling water and set aside/在滚水里先把虾和牛煮好放一边。

In a bigger bowl break the overnight rice, then add in the eggs and mix well/在一大碗里把饭搅散加入鸡蛋搅拌均匀。

In a nonstick pan add 3 to 4 tbsp. of veg oil and heat up a little bit, add in peas, corn and carrot mix and sautéed for one minute then add in the rice and egg mixture. Add salt, chicken powder and a little bit of white pepper and stir constantly until each individual grain of rice is wrapped with egg. Add in shrimps and beef and scallion alone with a few drop of sesame oil. / 加3-4tbsp 油在一不粘锅里等油热了加入青豆,玉米和萝卜稍微炒一下。 接着加入蛋饭。加盐,鸡粉和一点白胡椒不停的炒至每一粒米都被鸡蛋包住。最后加入虾,牛和葱花 与几滴的芝麻油。


This is roast pork and duck with purple cauliflower fried rice.

IMG_9261

Tiramisu/提拉米苏蛋糕

download

This is the best tiramisu recipe ever I found from Wenxuecity.com/这是我从文学城上找来的食谱。非常的好吃。

Ingredients:

1 shot Espresso (一份Espresso咖啡)

Some Bittersweet Chocolate( ¼ inch of cube) (一小块巧克力)

1 tbsp Kahlua Liqueur (一大勺Kahlua 咖啡酒)

1-2 tbsp Rum (一,二大勺郎姆酒)

2 pack of lady fingers (两份手指饼)

7 Egg yolks (raw) (七个蛋黄)

½ cup sugar (半杯糖)

8 oz Mascarpone Cheese (8 oz Mascarpone 乳酪)

2 cup of heavy cream (两杯鲜奶油)

A little bit vinila extract(少许香草精), 2-3 tsp sugar for whip cream (2-3小勺糖,用于打发奶油)

Some unsweeted coca powder (少量无糖可可粉)

Directions

  1. Mix Espresso , Chocolate and Kahlua Liqueur together and set aside. (You may need to warm up the coffee to melt the chocolate) (融化巧克力,和Espresso,咖啡酒混合待用)
  2. Add sugar toegg yolks and beat until the sugar melt.( Use a double boiler or put mixing bowl over hot water) (蛋黄加糖打至糖融化。盆子隔水加热以助融化。).
  3. Add Rum, Cheese to the egg yolks, mix until smooth(about 1-2 minute)(把郎姆酒,奶酪加到蛋液里搅拌一两分钟至均匀)
  4. In another clean bowl, add 2-3 tsp sugar and vinila extract to heavy cream, beat the heavy cream until hard peaks form.(另取一干净盆,加入香草精和2,3小勺糖, 将奶油打发)
  5. Fold the whipped cream to the egg/Mascarpone mixture. (把打发好的奶油和蛋黄奶酪翻拌均匀。)
  6. Lay lady fingers in a glass baking dish (8x8x2 square dish)(将一半手指饼排放在烤盘里。)
  7. Brush lady fingers with expresso/chocolate mixture.(手指饼上刷上咖啡巧克力溶液。)
  8. Spread half of egg/Mascarpone mixture on the lady finger.(倒入一半的蛋奶酪混合物, 铺平。)
  9. Lay another layer lady fingers, brush with coffee mix.(排放另一半手指饼)
  10. Spread the rest of egg/mascarpone mixture.(倒入另一半的蛋奶酪混合物, 铺平)
  11. Let it rest for 12-24 hours in the refrigerator.(放到冰箱里冰12-24小时)
  12. Sift the coco powder on top before serving(吃前撒上可可粉)

Chinese Moon Cakes/月饼(冰皮,广式)

网上找来的最好的月饼食谱。君之的。

http://blog.sina.com.cn/s/blog_4a5089ff0100ad9g.html

莲蓉蛋黄月饼(广式)】(参考分量:重约100克的月饼10个)
配料
饼皮:中筋面粉100克,奶粉5克,转化糖浆75克,枧水1克,花生油25克。
馅料:莲蓉约750克,咸蛋黄10个。
表面刷液:蛋黄水(蛋黄1个+蛋清1大勺调匀而成)
烤焙:200度,中层,约20分钟。烤5分钟定型后取出来刷蛋黄水。

制作过程
1、枧水,是一种碱性的水溶液,成分较复杂。如果买不到,可以把食用碱面和水按1:3的比例混合调制来代替(比如,10克碱面里兑30克水,可以制成40克的枧水)。在转化糖浆里加入枧水,搅拌混合均匀。
2、在混合好的糖浆里,加入花生油,并搅拌混合均匀。
3、倒入面粉和奶粉
4、揉成面团。揉好的面团包上保鲜膜静置1个小时。
5、准备好生的咸蛋黄(注意,不推荐用熟咸蛋黄)。如果你的咸蛋黄比较腥,将咸蛋黄在植物油里浸泡半个小时,可以去除腥味。
6、面团静置好以后,根据需要分隔成小份。把莲蓉馅也分成相应的小份。皮和馅的比例是2:8。比如,如果你要制作100克一个的月饼,就把饼皮面团分成20克一个,莲蓉馅加蛋黄为80克。

7、把1份莲蓉馅分成两块,在中间夹上蛋黄。
8、夹好蛋黄的莲蓉馅揉成圆形。
9、取一个饼皮面团,在手掌上压扁。(饼皮面团比较粘,要在手掌上拍点面粉防粘)
10、把莲蓉馅放在面团中间。
11、用两只手把饼皮慢慢往上推,包裹住莲蓉。
12、继续往上推,直到把莲蓉完全包住。注意力度,要尽量让饼皮厚薄均匀,不要露馅。

13、包好以后,成为一个圆球。
14、在圆球上拍一点面粉,方便一会儿脱模。把圆球面团放进月饼模子。
15、月饼模直接按在烤盘上,压出月饼花纹(烤盘上不要涂油,也不要垫防粘的东西,但可以垫锡纸)。
16、提起月饼模子,就OK了。在月饼表面喷点水,放进预热好200度的烤箱烤焙。烤5分钟左右,等月饼花纹定型后,取出来在表面刷上蛋黄水(只刷表面, 侧面不刷),再放进烤箱,烤到周围呈腰鼓形,饼皮均匀上色以后就可以了。一共大约需要烤20分钟(时间供参考,请根据烤箱实际情况调整)。

毛毛妈的。(以下图片中我做的是无皮绿豆绿茶味的的。)

http://maomaomom.com/【豆蓉广式月饼】自制糖浆月饼制作常见问题解答/

Mookcakes IMG_7853

IMG_7859

IMG_1054

用料:
豆蓉馅:
1:花皮豆(Romano Beans)一袋900克;
2:白糖2.75杯(575克),炼乳半罐150毫升,玉米油1杯(192克);
饼皮:
3:小苏打(Baking soda)1/2茶匙,水1大匙;
4:转化糖浆2/3杯(175克),玉米油1/4杯(48克);
5:中筋面粉(All purpose flour)1.5杯(235克);
蛋液:
6:鸡蛋黄1个加水1大匙拌匀;
转化糖浆:
7:白糖4杯(800克),水1又1/4杯(290克),新鲜柠檬2个(榨汁6大匙),白醋2大匙;
8:小苏打1/4茶,水2茶匙。
注:1大匙=15毫升=1 Tablespoon,1茶匙=5毫升=1 Teaspoon。1杯=240毫升。皮料可做15个120克重的月饼,馅料可以做24个90克的馅,多余的豆蓉可以冰冻箱保存,以后做别的点心。

做法:
1、转化糖浆(来自私房为为):柠檬洗干净外皮,切开挤汁后,把柠檬切小块。小锅中放糖和水,大火加热至糖溶化,转小火,同时加柠檬汁、柠檬块及白醋。小火一直煮到糖浆温度为108oC,立即离火。小苏打加水溶解后,倒入煮好的糖浆里,搅拌均匀。此时会有很多气泡,没关系,等糖 浆凉了以后就好了。完全凉后过滤到容器中,室温密封保存。糖浆最好放2个星期再用比较香。

 IMG_7918IMG_7951

2、花皮豆蓉:花皮豆水里泡24小时,剥去皮。放入高压锅里,加水3.5杯,压30分钟。煮好豆子倒入大的不粘锅里,加入2料理糖,中火炒至馅浓稠,后分3次加入油,在炒至馅干挺,没什么水气了便可。
3、馅冷后放案板上揉均匀,然后取15个90克的馅,揉成球备用。4、广式月饼:将3料放一盆里拌匀,然后放入所有4料拌匀,然后放入5料的面粉,用叉子拌成软面团。盖上保鲜膜静置0.5-1小时。
5、面团搓成长条,分成15份(每份30克)。手掌放一份月饼皮,两手压压平,上面放一份月饼馅。一只手往下轻推月饼馅,另一只手的手掌轻推月饼皮,使月饼皮慢慢展开,直到把月饼馅全部包住为止。
6、包好的月饼表皮轻轻的抹一层干面粉,把月饼柸放入模型中,轻轻压平,力量要均匀。然后用擀面杖在模反面,上下左右都敲一下,就可以轻松脱模了。依次做完所有的月饼,用刷子轻轻刷去表面的面粉。
7、放入铺了考盘纸的烤盘里并放入预热至395F/200摄氏度的烤箱内,烤6分钟后,拿出刷上蛋液(少少量),温度调到340F/170摄氏度烤7分 钟。然后拿出再刷一次蛋液再 烤5分钟。然后开Broil低档2-5分钟上色即可各家的烤箱不同,注意温度及时间。月饼冷后放入密闭盒里回油2-3天,再吃。

君之的。(以下图片中我做的是紫薯的。)

http://blog.sina.com.cn/s/blog_4a5089ff0100adyk.html

 cakes

IMG_1005

冰皮豆沙月饼】(参考分量:70克的月饼约8个)
冰皮配料:糯米粉45克,粘米粉35克,澄面(小麦淀粉)20克,牛奶185克,糖粉50克,色拉油20ML
馅料:豆沙馅适量
另准备糕粉(炒熟的糯米粉)适量

制作过程
1、在盆里倒入牛奶、糖粉、色拉油搅拌均匀。
2、倒入糯米粉、粘米粉、澄面。充分搅拌均匀,成为稀面糊
3、搅拌好的稀面糊静置30分钟,然后入蒸锅,大火蒸15-20分钟即可蒸熟。
4、蒸熟的面糊,用筷子使劲的搅拌至顺滑。然后等待其冷却,就是冰皮了。
5、冷却后(如果心急,可以不等到完全冷却,不烫手即可。但完全冷却更好操作),把冰皮分成40克一个,豆沙馅分成30克一个。在手上拍点糕粉防粘,然后将冰皮放在手心压扁,放上一块豆沙。
6、用冰皮把豆沙包起来,并慢慢往上推,直到把豆沙全部包裹住,收口。

7、在模具里撒点糕粉,让糕粉均匀粘在模具壁上,然后把多余的糕粉倒出来。这样可以方便脱模。然后把包好的冰皮面团放进模具。
8、用手掌压实了。
9、把月饼模用力磕一下,再倒出来,冰皮月饼就做好了。
10、做好的月饼放进冰箱,冷藏一晚,就可以吃了。

醉排骨/ Ribs with Minced Garlic Sauce

IMG_7886

酱汁/Sauce:

耗油/Oyster sauce 1tbsp

酱油/Soy sauce ¼ cup

水/Water 2 tbsp

糖/Sugar 3 tasp

白胡椒少许/ Little bit of white pepper

鸡粉少许/ Little bit of chicken powder

蒜头切碎/Minced garlic 1tasp

醋/Vinegar 2 tbsp

排骨一磅用少许盐,鸡粉与料酒腌渍1个小时。等要炸的时候加入少许地瓜粉。

锅中放入油,5 成热的时候放入排骨炸4 分钟捞起。等油再次热起来到7 成热时放入排骨再炸2分钟至外面酥脆肉熟捞起。趁热加入酱汁拌匀。

This is cooked with fried taro. Yummy!!!

2

Marinate one pound of ribs with little bit of salt, chicken power and cooking wine for one hour. Add 3 tbsp of corn starch when ready to be deep fried.

Add enough oil to the cooking pan, wait till the oil is around 150C add the ribs and deep fried for about 4 mins and take them out of oil. Put the ribs back to the oil when the oil gets to around 180C and fried until the rips are golden brown outside and still tender inside. In a big bowl, add the sauce to the ribs when it is still hot and mix well.

American Cheese Cake VS. Chinese Cheese Cake/西式与中式起司蛋糕

cheese cake 1

I think I got this recipe from food network long time ago, I don’t remember whose recipe it is now.

For the crust:

1 1/2 cups graham cracker crumbs (10 crackers)

1table spoon sugar

6table spoons (3/4 stick) unsalted butter, melted.

For the filling:

2 1/2 pounds cream cheese, at room temperature.

1 1/2 cups sugar

5 whole extra-large eggs, at room temperature

2extra large eggs yolks, at room temperature

1/4 cup sour cream

1 table spoon grated lemon zest (2 lemons)

1 ½ teaspoon pure vanilla extract.


Preheat the oven to 350 degrees F

To make the crust, combine the graham crackers, sugar and melted butter until moistened, pour into a 9 inch spring form pan. With your hands press the crumbs into the bottom of the pan and about I inch sides, bake for 8 minutes, cool to room temperature.

Raise the oven temperature to 450 degree F. To make the filling, cream the cream cheese and sugar attachment on medium- high speed until light and fluffy about 5 minutes. Reduce the speed of the mixer to medium and add the eggs and egg yolks, 2 at a time, mixing well. Scrape down the bowl and beater as necessary. With the mixer on low, add the sour cream, lemon zest, and vanilla. Mix thoroughly and pour into the cooled crust.

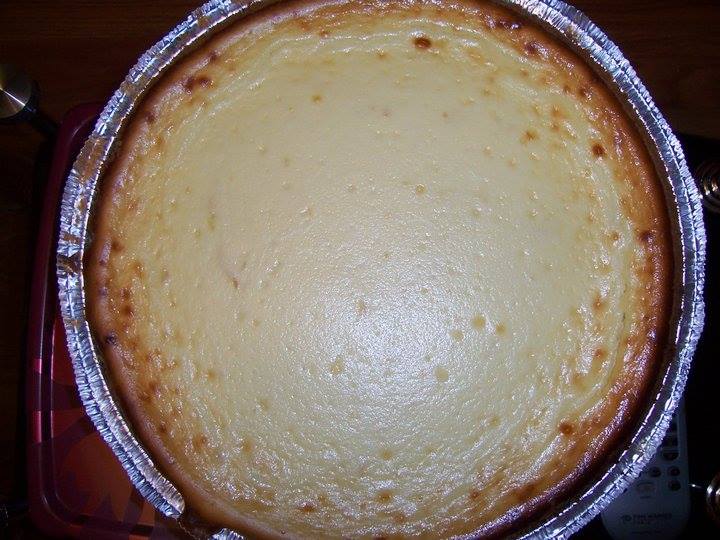
Bake for 15 minutes. Turn the oven temperature down to 225 degree F and bake for another 1 hour and 30 minutes. Turn the oven off and open the door wide. The cake will not be completely set in the center. Allow the cake to sit in the oven with the door open for 30 minutes. Take the cake out of the oven and allow it to sit at room temperature for another 2 to 3 hours until completely cooled, wrap and refrigerate overnight. Remove the cake from the spring pan by carefully running a hot knife around the outside of the cake, leaving the cake on the bottom of the spring form for serving


cheese cake 2

毛毛妈的食谱。

http://blog.wenxuecity.com/myblog/9747/all.html

IMG_2055

用料

1:低脂乳酪(CRAFT Philadelphia, low fat cream cheese, 95% fat free) 250g,牛奶2/3杯,玉米油1/4杯。
2:蛋黄6颗,打散备用。
3:淀粉(Corn starch或其他的starch)2大匙,中筋面粉(All Purpose Flour)2大匙,水1/2杯,搅拌均匀。
4:蛋白6颗,糖3/4杯,淀粉2大匙,塔塔粉(Cream of tartar)1茶匙或白醋1茶匙。

做法

将1料放入一锅里,置炉上开中小火,隔水搅拌至融化。接着加入2料,继续搅拌呈均匀糊状。再加3料,搅拌均匀离火,稍冷用搅拌器高速打2分钟备用。

另 取一干净的盆,放入蛋白与茶匙白醋1茶匙,用搅拌器高速打2分钟,边打边加入糖和淀粉,继续高速打2分钟。将1/3打发的蛋白加入乳酪糊中,搅拌均匀。 然后将全部乳酪糊到入剩下的2/3蛋白中,用橡皮刀从上往下轻轻拌匀, 然后倒入铺了烤盘纸的23厘米直径(九寸模)的园烤盘里。
将园烤盘外面包上锡箔纸防进水,放入盛了水的大烤盘里。然后整個放进预热至340F/170oC的烤箱内,烤20分钟。看到表面开始上色之后降温至290F/145C. 再水浴烤45分钟左右。牙签叉入蛋糕,取出不沾就烤好了。冷凉后,最好保湿冰箱过夜,第二天切块食用。


Ingredients:

1 lowfat cheese (CRAFT Philadelphia, low fat cream cheese,95% fat free) 250g, two-thirds cups of milk, one-fourth cup corn oil.
2: 6 PCs of egg yolk, beaten aside.
3: starch (Corn starch or starch) 2 tablespoons all purpose flour (All Purpose Flour) 2 tablespoons 1/2 cups of water, stir well.
4 Egg white 6, three-fourths cups of sugar, starch 2 tablespoons, Tartar (Cream of tartar) 1 teaspoon or white vinegar 1 teaspoon .

Over a medium heat have a pot with some hot water, mix all #1 ingredients in a bowl float in the hot water and stir until everything melt. Then add # 2 ingredients and continue stirring until it form homogeneous paste. Add # 3 ingredients, stir well Take the bowl away from the heat  Cool down slightly and mix it with mixer in high speed for 2 minutes.
In another clean Bowl, add all egg white and 1 teaspoon of white vinegar and beat 2 minutes with the mixer in high speed then add sugar and starch, continues high speed for 2 minutes. Get one-third of egg white into egg yolk cheese paste, stir well. Then pour everything into the rest of egg white, and mix gently with a rubber spoon from the top to down, then pour into a 23 cm diameter (nine inch mode) that is lined with parchment paper,
Coated the spring form with foil for waterproof, bake it in a water bath. Put in the  preheated oven 340F/170C and bake for 20 minutes.  When surface begins to brown lower the heat to 290F/145C. Water bath and continue to bake for 45 minutes more or so. Stick a toothpick into the cake, if nothing sticks to the toothpick then it is done.  Refrigerate it  overnight, it is best to serve the next day.

Chow Mai Fang/炒米粉

Ingredients:

10 Oz.Mai fang

¼ head of shredded Cabbage

¼ lb Shredded beef marinated with a little bit of salt, chicken power and cooking wine

A few Peeled Shrimp marinated with salt, cooking wine and pepper

One shredded Squid marinated with salt, chicken power and cooking wine

One scallion

Cooking:

Bring water to boil. Precook cabbage first, drain. Then precook shrimps and squid in the boiling water too.

In a hot pan add oil and precook beef.

Add some oil in the sauté pan, add white part of scallion, cabbage and precooked mai fang cook for 2 mins with 1/3 cup of water. Add beef and seafood, 4 tbsps. of oyster sauce, 3 tbsp. of cooking wine and 1/3 tbsp. of chicken power, mix well. Add a few drop of sesame oil and green part of scallion at the end. You can add some hot oil if you like it hot and spicy.

材料:

300克米粉

¼ 颗台湾椰菜切丝

1/4 磅牛肉切丝 加少许盐,鸡粉和料酒腌渍

几只虾剥皮去线加盐,鸡粉和白胡椒腌渍

一只鱿鱼切丝加盐,鸡粉和料酒腌渍

一条葱

煮开一锅水,先把椰菜煮熟。接着把虾与鱿鱼也在水中煮熟 盛起。

在炒锅中加油先把牛肉炒熟, 盛起。

加多一点油在锅里,加入葱白,椰菜,米粉还有1/3 杯水煮两分钟。加入牛肉海鲜,4tbsp 耗油,3tbsp 料酒,1/3 tbsp 鸡粉,搅拌均匀。最后加几滴的芝麻油和葱。喜欢辣的还可以加辣油。

Similar way of cooking ShangHai noodles and Hofun.

IMG_9128IMG_0344

Oven Baked Baby Back Ribs/翠花排骨

IMG_3366.JPG


IMG_0998

This is the most famous CuiHua ribs that a lot of people love. I’ve done it so many times and everyone loves it so much. Thanks to CuiHua.

Here is the link to the original recipe: http://blog.wenxuecity.com/myblog/8387/200602/2769.html

Dry ingredients:

Baby back ribs about 3 pounds, cut into 2 pieces.

7 tbsp of Brown sugar

2 tbsp of chili powder

1 tbsp of salt

1 tbsp of garlic powder (optional)

Wet ingredients:

7 tbsp of light soy sauce

2 tbsp of cooking wine

3 tbsp of honey

7-8 pieces of fresh garlic

1 tbsp of vinegar

2-3 tbsp of water

Mix the dry ingredients, and then rub the ribs with it. Wrap the ribs separately with foil and marinate them in the refrigerator for at least 3 hours.

Mince the garlic.

Mix all the wet ingredients and pour the wet ingredients to the ribs. Make sure you use enough foil to wrap the ribs, so the wet ingredients will stay inside with the ribs. Also seal the foil really tight without any crack.

Preheat the oven to 375-380F, bake the ribs for 1.5 hours in the oven.

Enjoy.

WeChat Image_20170508210725

这是网上非常出名的翠花排骨。我已经做过无数遍了,深得大家的喜爱。谢谢翠花姐。

原方在此: http://blog.wenxuecity.com/myblog/8387/200602/2769.html

主料:一整条小排骨

简单的三个步骤:

一.干料:
7汤勺红糖
2汤勺干辣椒面
1汤勺精盐
1汤勺蒜粉(可不加)

调制:
把以上干料放一碗中充分混拌均匀;
排骨分切成两半,按半条排骨的大小,宽松的撕下两大块锡箔纸在厨案上铺平,取一半条排骨放在上面,用混合好的干料均匀的揉抹在排骨正反两面,并尽量多给排 骨一点时间按摩很重要,而后密封锡箔纸:先顺长对折重复折叠边儿口,再密封一边儿的侧口,留下一边儿口虚掩着,放冰箱冷藏室腌放至少3小时以上。( 两小时至六小时之间都可以,时间再长点也无妨。)

.湿料:
7
汤勺淡酱油
2汤勺料酒
3汤勺蒜末
3汤勺清水
1汤勺白醋
3汤勺蜂蜜

调制:
把上述调料在一碗中,用汤勺充分调拌均匀,成汁料。
将两包小排骨从冰箱中拿出,打开虚掩的一边口,把湿料汁顺着敞开的口,在排骨的底部一勺一勺的灌进去,每包排骨灌汁料约六-八汤勺左右,再密封好这个口放平在烤盘里,不露汽是很重要的一个步骤。

三.烤排骨:
烤箱预热华氏375度,放入排骨烤盘,烤约1小时30分钟左右,(请安排骨的大小多少而灵活调整烤制时间)打开锡纸包检查看排骨似轻松脱骨就好了,把烤好的排骨放到盘子里,用锯齿快刀顺排骨切成一根一根的,再将锡纸包里的肉汁浇在切好条的排骨上,这时就可上桌了。
(如口轻的话,可减掉浇排骨汁程序。)