Scallop In Garlic Sauce/蒜香扇贝

WeChat Image_20171128183403

WeChat Image_20171128191539

Live scallop 6 pieces

Garlic 6 cloves (minced)

Red bell pepper 4tbsps (minced)

Oil 4 tbsps

Soy sauce for steam fish 3tbsps

Vermicelli 50g

Ginger 1tbsp (minced)

Scallion 2tbsp (finely chopped)

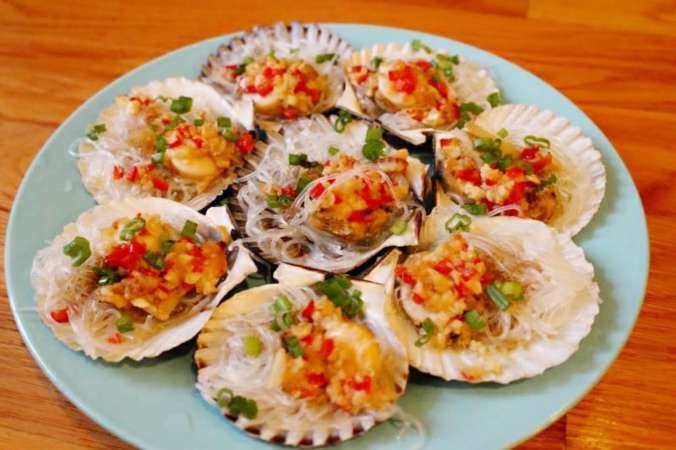
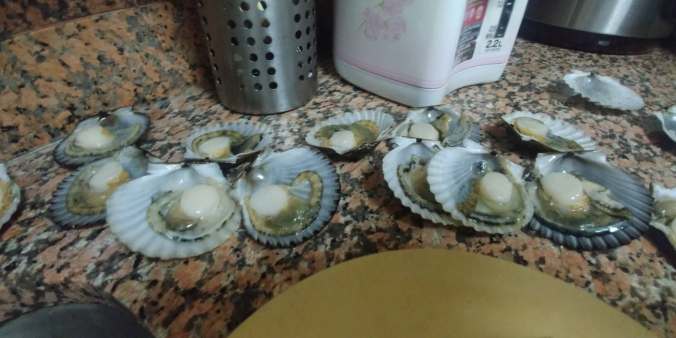
Cut open the scallops and take the white part of the body out and clean the shells.  (each side has half of the scallops)

Add 1tbsp of salt to the scallops and wash them with running water until they are clean without any sand.

Add oil to a cooking pan, heat it up, add ginger and garlic and sauté for 2 minutes or until lightly brown, add the red bell pepper and combine.

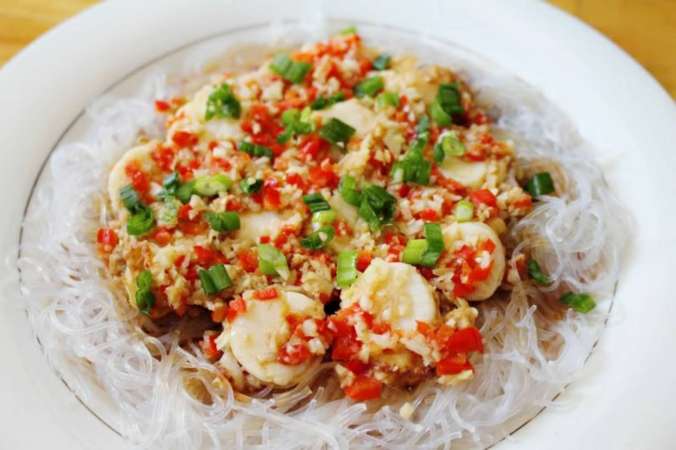
Bring some water to boil then cook the vermicelli for a minute. Drain then cut them shorter.

Divide the vermicelli into 12 equal portions and put them in each of the shells.

Put one pieces of scallop in each shell, then add some of the garlic ginger sauce on the top.

Put the scallops with shells on a big plate (I don’t have a plate big enough for all of them)

On a big cooking pan bring some water to boil, steam the plate of scallops over the water for 5 minutes.

Add soy sauce to each shell then garnish with some scallion for color.

WeChat Image_20171128191721

活扇贝6只

大蒜6颗 (剁碎)

红甜椒 4汤匙 (剁碎)

油4汤匙

蒸鱼酱油3汤匙

粉丝50克

姜 1tbsp (剁碎)

大葱 2汤匙 (切碎)


切开扇贝, 取出白色的贝肉, 清理干净贝壳。(切开后每边有一半的扇贝)

在扇贝中加入1汤匙 的盐, 用自来水冲洗, 直到它们干净无砂。

将油加入锅中, 加热, 加入生姜和大蒜, 煎=炒2分钟或至淡褐色, 加入红甜椒。

把一些水煮开, 加入粉丝煮一分钟。然后把它们剪短。

把粉丝分成12等份, 把它们放在每个贝壳里。

在每个贝壳中放入一只干贝, 然后在上面加入一些刚煮的大蒜姜汁。

把扇贝放在大盘子里 (我没有够大的盘子装所有的扇贝)

在一个大锅里煮开一些水, 隔水蒸扇贝5分钟。

在每个扇贝中加入蒸鱼酱油, 然后用一些葱来装饰颜色。


Vegetarian Goose/素鹅

IMG_8185

This dish is totally vegetarian, but it has the texture and flavor of meat. It is easy to make and very healthy. If you like soy bean product, you are going to love this, come on give it a try!

Bean curd sheet 3 pieces

Suace:

Light soy sauce 1.5tbsps

Dark soy sauce 1.5tbsps

Water 1 cups

Sugar 1tbsps

Ginger 2 thin slices

  1. In a small sauce pan bring everything for sauce to boil then continue to cook for 2 minutes. Turn the heat off, let cool for 15 minutes.
  2. Use a scissor to cut the edge of the bean curd sheet off and put them into the sauce.
  3. Spread a piece of bean curd sheet on the table, then use the edge as a brush to brush some sauce on the surface.
  4. Add the second piece of bean curd sheet on top of the first piece then repeat the brushing.
  5. After you’ve done all three of them, put the edge of bean curd sheet in the middle then fold the edges over like we do egg rolls, then cut them in halves.
  6. Bring some water to boil, and then steam the rolls over the water for 5-7 minutes. Turn the heat off, let cool for 15-20 minutes.
  7. Add 3-4 tbsps oil in a cooking pan and heat it up. Pan fry the rolls for 2 minutes on each side or until golden brown.
  8. Add the sauce to the cooking pan with the rolls in it and simmer about 10-15 minutes or until the sauce is all absorb by the rolls.
  9. Let the rolls cool down then cut into smaller pieces.

This dish is usually served cold.

IMG_8183

鲜腐皮3张

酱汁:

生抽1.5汤匙

老抽1.5汤匙

水1杯

糖1汤匙

姜2薄片


  1. 在一个小的锅里, 把所有的酱汁材料放一起煮开, 然后继续煮2分钟。 关火冷却15分钟。
  2. 用剪刀把鲜腐皮的边缘剪下来, 放到酱汁里。
  3. 将一张鲜腐皮摊开放在桌上, 然后夹出放在酱汁里的边角当刷子刷一些调味汁在鲜腐皮上。
  4. 将第二片鲜腐皮放在第一片的上面, 然后重复刷酱汁。
  5. 当你把三张都叠好刷上酱汁后,把边角放在鲜腐皮上面难后像我们做春卷一样把鲜腐皮折叠起来,, 然后切成两段。
  6. 把一些水烧开, 然后放折好的素鹅蒸5-7 分钟。关火, 冷却15-20 分钟。
  7. 在另一个锅里加3-4 汤匙油, 然后加热。放素鹅进去每边煎2分钟或直到成金黄色。
  8. 将剩下的调味汁放入锅中小火煨煮素鹅约10-15 分钟或直至酱料全部被素鹅吸收。
  9. 素鹅冷了以后切成小块。

这道菜通常是当凉菜吃的。

WeChat Image_20171127221856

WeChat Image_20171009222037

Happy Thanksgiving 2017

I want to wish everyone a Happy Thanksgiving! Wish you and your family good health and good eat!

I only made up my mind 2 weeks ago that I was going to cook for thanksgiving again this year! I didn’t really know what to cook because I wanted to have something different. I checked online and googled for different recipes, I only did one new dish: wild rice with Pumpkin salad, others pretty much the same like before. I think if I am going to cook again next year, I will do at least 3 new side dishes.

WeChat Image_20171123183015.jpg

Brine Turkey

This turkey I bought was super skinny, after roasting, the bone in the middle of breasts was popping out. I brined the bird for 3 days so it was so juicy and delicious.

IMG_8139.JPG

IMG_8135

Wild Rice With Pumpkin Salad

This is the new dish for year 2017. I expected it to be super delicious, it was, but it took me forever to cook the rice. Next time I will soak it in water overnight to see if it will cook faster.

WeChat Image_20171123183027

Carrot with maple syrup

WeChat Image_20171123183035

Brussels sprouts with bacon

WeChat Image_20171123183042

Cornbread stuffing with sausage

IMG_8175

Gravy

I added some Cavit Pinot Grigio to my gravy and the flavor was so good! I think I will continue to use it whenever I make gravy.

IMG_8169

Orange flavor cranberry sauce

IMG_8144

Mushed potatoes with cheese

IMG_8150

Creme Brulee

img_1489


Braised Egg/卤蛋

I made another dish for the potluck party this year: braised egg. It is another simple easy dish. I purposely buy the smaller size egg because it will be easier to make it flavorful.

WeChat Image_20171120195418.jpg

I use same kind of sauce for braised duck, pork and any other kind of meat for eggs. Here is the link:

https://caiqinchen.com/2017/08/31/braise-duck%e5%8d%a4%e9%b8%ad/

Cook the eggs in the boiling water for 10 minutes, then peel the shells. add the eggs to the sauce and bring the sauce to boil, then turn the heat down continue to simmer for 30 minutes. Leave the eggs in the sauce for a few hours or overnight for best result( no need to refrigerate it), the next day take the eggs out of the sauce. The secret to this dish is to save the leftover sauce every time you braise something and keep the sauce in the freezer, and the next time when you want to braise something else add the sauce from before, the flavor will get better and better every time! ( shhh… Don’t tell anyone) It is also very good to mix noodles with this sauce. Yummy

我用同样用来卤鸭, 猪肉的酱汁卤的鸡蛋。以下是链接:
鸡蛋在沸水中煮10分钟, 然后剥壳。将鸡蛋放入调味汁中, 并将酱汁煮沸, 然后将火关小煮30分钟左右。把鸡蛋泡在调味汁里几小时或过夜(不必冷藏)。 第二天把鸡蛋从酱汁里捞出来。这道菜的秘诀是, 每次你卤完东西后把剩下的酱汁放在冻箱里时,下次当你想卤东西的时候一起用, 味道就会越来越好了!(嘘.不要告诉别人) 这也是非常好的拌面酱。美味!

Meatballs With Hoisin Sauce/海鲜酱肉丸子

It is the time of year for my company’s annual potluck party. I was requested by my dear coworkers to make my signature dish: meatballs. It is a simple dish, yet delicious. This time I used 2/3 pork and 1/3 beef. I made 94 meatballs so I decided to deep fry them instead of pan fry like last year. It turned out deep fry is much faster and also the meatballs won’t break apart. I did change the recipe a little bit this time, for example I added the water chestnut instead of dried mushroom, after I finish rolling the balls, I wrap them with a thin layer of corn starch on the surface. According to my coworkers, they were good! I do believe them because at the end of the party, there was not single piece left.

https://caiqinchen.com/2016/11/25/meat-balls-with-hoision-sauce%e6%b5%b7%e9%b2%9c%e9%85%b1%e8%82%89%e4%b8%b8/

IMG_8119.JPG

又是一年一度我工作的公司的聚餐时间。我亲爱的同事们要求我做我的招牌菜: 肉丸子。这是一个简单但美味的菜, 。这次我用了2/3 猪肉和1/3 牛肉混合起来做。我做了94个肉丸子, 所以我决定用油炸, 而不是像去年的煎。结果 油炸要快得多, 肉丸也不会裂开。这一次我改变了食谱一点点, 例如, 我加入了荸荠, 而不是香菇, 在我完成全部肉丸子后, 我包裹一层薄薄的玉米淀粉在表面。据我的同事说很好吃!我相信他们, 因为在聚餐结束之前就一颗不剩了。

https://caiqinchen.com/2016/11/25/meat-balls-with-hoision-sauce%e6%b5%b7%e9%b2%9c%e9%85%b1%e8%82%89%e4%b8%b8/

How To Fix a Cracked Cheese Cake/怎么修补芝士蛋糕

WeChat Image_20171119203049

I made this cheese cake for someone special, I followed recipe 100%; however the cake cracked before it came out of oven. I was very upset because I didn’t have time to make another one. Also I didn’t know what I did to cause this.

WeChat Image_20171116224622

I was thinking let me check with google to see if I can fix it. Well, there were so many different ideas out there. So I decided to try the sour cream one because it seemed like a good idea. After I apply the sour cream mixture ( with sugar and vanilla) to the crack. I baked it for another 20 minutes. It didn’t turn out to be OK after it cooled down, the colors were different, and the sour cream sank down.

WeChat Image_20171119203943

Finally I decided to use the second fixing idea, this time it worked much better than I expected, actually it worked like MAGIC!!!! Here is the link to it: https://www.youtube.com/watch?v=1Wg_PVc84Zk

Not only it works really good, it is super easy. I should have tried it at first. But make sure you do it after you refrigerate the cake for hours. ( I did it the next day) I didn’t add the jam and fruit on the top to cover it up (it was perfectly fine without). But I wanted to make the cake a little fancier, so I did the decoration.

WeChat Image_20171116224153

I cooked my own strawberry jam by cooking one pound of strawberry with 4 tbsps sugar and 3 tbsps water for about 30 minutes. Nobody noticed the cake was cracked, and everyone liked it so much. bravo!!!

WeChat Image_20171116224723

After the google search, I also found out the reasons for the crack. Everything needs to be in the room temperature and I didn’t take the eggs and cream cheese out of my refrigerator long enough. By the time I added the egg to the mixture, my mixer speed was kind of high (medium instead of low) so I over-mixed the batter. It was such a good experience for me, not only I made a tasty cake, but also learn something new!!!

Here is the link to the recipe: https://caiqinchen.com/2014/08/23/american-cheese-cake-vs-chinese-cheese-cake/

Roast Pork Fried Rice/叉烧炒饭

IMG_8088.JPG

I made the best fried rice ever today!!! It took hours and hours of work to make this dish, you don’t believe it? Let me tell you why.

I made my own Roast pork, and I used a wooden steamer to cook the rice. I also made the pork fat to fry this. Now you see, it took days to get this dish done. It sounds pretty challenging, and it is! I can’t believe I made it.

Here are the links to the home made roast pork and steam rice:

https://caiqinchen.com/2014/10/29/328/

https://caiqinchen.com/2014/09/08/steam-white-rice%e8%92%b8%e7%99%bd%e7%b1%b3%e9%a3%af/

IMG_8083.JPG

我今天花了很多很多的时间煮了最好吃的炒饭。你也许会问炒个饭为什么会花很多时间呢?让我慢慢告诉你。

我的叉烧是自己烤的,饭是放在杉木桶里蒸出来的,还熬了猪油来炒饭。 听起来很麻烦费时吧? 还真的很不容易,我都不相信自己居然做到了。

下面是做叉烧和蒸饭的链接:

https://caiqinchen.com/2014/10/29/328/

https://caiqinchen.com/2014/09/08/steam-white-rice%e8%92%b8%e7%99%bd%e7%b1%b3%e9%a3%af/

Cuttlefish With Black Bean Sauce/豆豉墨鱼

IMG_4838.JPG

WeChat Image_20171114213328

Cuttlefish 8 pieces

Jumbo shrimp 2 pieces

Purple onion ¼

Celery 1 stalk

Scallion 1 whole piece

Chinese preserved sour cabbage 2 oz.

Carrot a few pieces

Ginger 1 slice

Black bean 10 pieces

Oyster sauce 1.5 tbsps.

Soy sauce 1tbsp

Cooking wine 1.5 tbsps.

Pinch of white pepper

Chicken bouillon 1/3 tsp

Cuttlefish is similar to squid, but much bigger and the meat is thicker too.  I cut the fish both vertical and horizontal, but do not cut through, cut about 2/3 of the depth, then cut into small squares, after cooking each piece will frizzle to beautiful sharp.

Cuttlefish and shrimps marinated with 2 pinches salt, 1tbsp cooking wine and pinch white pepper for one hour.

Cook cuttlefish and shrimps in boiling water, 30 seconds for shrimp and 90 seconds for cuttlefish.

In a separated pan, heat up the pan with high heat then add 2 tbsps oil, add ginger, black bean and white part of scallion then stir fry for a minute.

Add the rest of vegetable and continue to stir fry for 2 minutes.

Add the oyster sauce, soy sauce and 1/4 cup water, cuttlefish and shrimp and continue to stir fry for a minute or so.

Add the rest of spices and scallion, mix well.

墨鱼8片
大虾2只
紫洋葱¼个
芹菜1根
葱1条
酸菜2盎司。
胡萝卜几片
姜1片
豆豉10颗
蚝汁1.5 汤匙
酱油1汤匙
料酒1.5 汤匙
一点白胡椒粉
鸡粉1/3 茶匙
墨鱼与鱿鱼相似, 但更大, 肉也更厚。 我把鱼切成了十字刀, 但不切透, 切约2/3 的深度, 然后切成小方块, 烹调后每一块都会卷起来很漂亮。
墨鱼,虾用一点盐腌制, 1汤匙料酒和少量白胡椒粉腌一小时。
在沸水中煮墨鱼和虾, 虾30秒, 墨鱼90秒。
在一个平底锅里,加热平底锅后加2汤匙油, 加入姜, 豆豉和葱白然后炒一分钟。
加入其余的蔬菜, 并继续炒2分钟。
加入蚝油, 酱油和1/4 杯水, 墨鱼和虾, 并继续炒一分钟左右。
加入其余的香料和葱, 拌匀。


Roast Pork Steam Buns/叉烧包

I am recently crazy about steam buns, always in the mood for more. Last time I made cabbage with ground pork steam bun, it was really good, but still for someone who loves meat so much, that wasn’t good enough. I was so much in the mood for roast pork steam buns. So here we go…. I made my own roast pork today to make my steam buns. Can I say it is so good and much better than store bought? Lol…

Today’s Chinese taboo story is about pear. Chinese don’t like to share pear with love ones because share Pear in Chinese has the same pronunciation as separation. Because we don’t want to be separated from our love ones so we don’t share pears.

mmexport1510541032482_mr1510541101278[1]

Here is the recipe for my roast pork steam buns:

Soy sauce 2tbsps

Oyster sauce 2tbsps

Sugar 1tbsp

Water ½ cup

Scallion 4 whole pieces

Roast pork 400g


Dice roast pork, thinly chop scallion.

Add 1 tbsp oil to a sauté pan and heat it up a little then add white part of scallion and sauté for a minute.

Add water, soy sauce,sugar and oyster sauce then bring it to boil, thicken it up by adding some starch water.

Add roast pork and green part of scallion and mix well. (Don’t continue to cook)

Here is the link for roast pork: https://caiqinchen.com/2014/10/29/328/

Here is the link for the dough: https://caiqinchen.com/2017/09/24/steam-buns%e5%8c%85%e5%ad%90/

mmexport1510540919471_mr1510541115332[1]

酱油2汤匙

蚝油2汤匙

糖1汤匙

水½杯

葱4条

叉烧400克


叉烧切丁, 葱切成葱花。

将1汤匙油加到炒锅中, 再加热少许, 然后加入葱白 炒一分钟。

加入水, 酱油, 糖和蚝油, 然后把它煮开 加一些淀粉水勾芡。

加入叉烧和葱花部 拌匀。(不要继续煮)

叉烧链接: https://caiqinchen.com/2014/10/29/328/

包子皮看链接: https://caiqinchen.com/2017/09/24/steam-buns%e5%8c%85%e5%ad%90/

pt2017_11_12_21_46_45[1]

Cake Roll/蛋糕卷

Someone suggested that I should add something about Chinese culture to my blog, so my blog will be more interesting. Well, I think this is a very good idea, and I can start doing it now.

So tonight I am going to share with you how to properly use Chinese chopstick. When you are dining at a Chinese table, you should never leave chopsticks standing straight up in a bowl of rice. This is considered as very bad table manners in China.  According to Chinese taboos, a bowl of rice with chopstick sanding straight up is for dead people.  So just put them down on the table next to your bowl when you are not using them.

IMG_4808

蛋黄5个

蛋白5个

低筋面粉60克

牛奶50克

绿茶粉 1 汤匙

细砂糖50克

玉米油50克

白醋几滴

动物性奶油2/3杯

汤2汤匙

做法:

  1. 蛋白、蛋黄分离
  2. 蛋黄盆里加入牛奶, 玉米油和绿茶粉
  3. 用手动打蛋器搅拌均匀
  4. 筛入低筋面粉
  5. 用打蛋器搅拌均匀,备用。
  6. 將蛋白盛入无水无油的打蛋盆里,加入白醋。
  7. 用打蛋器中速將蛋白搅打至大气泡,加入1 /3细砂糖。
  8. 继续用打蛋器中速搅打,至蛋白体积膨大,稍有纹路时再加入 1/3细砂糖。
  9. 继续用打蛋器中速搅打,出现明显的纹路时再加入剩下的细砂糖。
  10. 继续用打蛋器中速將蛋白搅打至湿性发泡, 就是提起打蛋器时蛋白霜有弯弯的沟。
  11. 取1/3蛋白霜加入蛋黄糊中用橡皮刮刀翻拌至均匀。
  12. 將搅拌好的麵糊倒入剩下的蛋白霜中继续用橡皮刮刀翻拌到看不到蛋白霜。
  13. 把蛋糕糊倒入铺了烤纸的烤盘中(14“x 11.5“)。
  14. 用刮板將蛋糕糊刮平整,刮的时候不要用力,自然力度帖住表面即可不要让蛋糕糊消泡。
  15. 放入预热好的烤箱中300F 烤35到45分钟
  16. 出炉后立即放在烤网上,等待蛋糕冷却。
  17. 将奶油加入糖用打蛋器打发到湿性发泡
  18. 待蛋糕还有点余温,拿张烤纸盖上,再侧翻过来,小心的取下蛋糕上的烤纸,再把蛋糕翻过来。
  19. 将打好的奶油涂在蛋糕表面,前面和中间多涂一点。卷的时候借助擀麵杖,一边把油纸捲入擀麵杖,一边將蛋糕推成卷状,整个卷好后用油纸包住蛋糕,放入冰箱冰30分钟。

IMG_4801