Rib Eye Steak Fajita And Taco Sunday

IMG_9669

IMG_9656

$13 for total of 4 fajitas and 4 tacos

I bought some really good rib eye steak today but didn’t feel like to do just the simple steak meal, so I came up with this Mexican style meal. I don’t eat Mexican food very often, so this is nothing near authentic I guess.  Anyway it was delicious!

Grilled my steak medium with some sea salt and pepper , then let it rest for about 15 minutes. I sliced it thin.

I also grilled a really sweet corn.

Bought a box of ld El Paso with both hard and soft shells.

Made some Guacamole. Here is the link for it.

https://caiqinchen.com/2017/07/07/guagomole%e9%b3%84%e6%a2%a8%e6%b2%99%e6%8b%89%e9%85%b1/

Diced some tomatoes, cilantro, and red onion.

bought some cheeses and one box of sour cream.

This is a simple, easy to prepare meal, but still delicious!

IMG_9638

IMG_9642

IMG_9648

IMG_9651

总共13美金每种饼各做4个

我今天买了一些非常好的肋骨眼牛排, 但我不想吃简单的牛排餐, 所以我想出了这个墨西哥风味的菜。我不常吃墨西哥食物, 所以这可能不太正宗。 反正很好吃就对了!

撒了一些海盐和黑胡椒粉后就烤我的牛排了, 烤好后让它休息15分钟。我把它切成薄片。烤多久就看你自己喜欢了。

我还烤了一个非常甜的玉米。

买了一盒有软的和硬的卷饼皮。

做了一些鳄梨酱。这里是它的链接。

https://caiqinchen.com/2017/07/07/guagomole%e9%b3%84%e6%a2%a8%e6%b2%99%e6%8b%89%e9%85%b1/

一些西红柿, 香菜和红洋葱切成丁。

买了一些奶酪和一盒酸奶油。

这是一个简单, 容易准备的饭菜, 但仍然美味无比!


Creamy Mushroom Soup/蘑菇浓汤

WeChat Image_20180419193052

2 servings and $2.25 per serving

Mushroom 300g

Flour 3tbsps

Small Yellow onion 1

Broth 2 cups

White wine 1 cup

Garlic 1 clove

Cream cheese 2 oz.

Add 2 tbsps unsalted butter and one cube of herbed olive oil to a saute pan and heat it up.

Add Minced garlic and onion to it and saute for 4, 5 minutes or until the onion is soft and tender.

Add sliced mushroom and continue to saute for 4 minutes.

Add flour to the mushroom and mix everything together and continue to cook for 2-3 minutes with medium low heat.

Add broth and wine to the mushroom and simmer with a cover on for about 20 minutes.

Pour the mushroom soup to a blender and blend until smooth after it cools down a little . (be careful not to pour too much at a time, and make sure you press the blender’s lid down hard because you don’t want the soup to come out the blender and go everywhere, also it is still hot)

Pour the soup back to the cooking pan and cook for about 7-8 minutes.

Add the cream cheese at the end and stir until melt. Add salt and pepper to the taste.

I garnished it with a few pieces of sauteed mushroom, sour cream and parsley.

I used the big brown mushroom, so the soup looked kind of dark. I think If I had used the white ones, the color should look much lighter. If you don’t care about calories, use 1 cup of cream and 1 cup of broth instead of 2 cups of broth. And you don’t need to add cream cheese at the end. The soup should taste much richer. I think one of these day, I should try once, I’ve been too careful with calories! Lol… Hope you will like it.

WeChat Image_20180419193058

WeChat Image_20180419193046

2份, 每份$2.25 元

蘑菇300克

面粉3汤匙

小黄洋葱1个

肉汤2杯

白葡萄酒1杯

大蒜1粒

奶油芝士2盎司。

添加2汤匙无盐黄油和一个粒的香草橄榄油到煎锅里加热它。

将大蒜剁碎和洋葱条加入炒4-5分钟, 直到洋葱变软。

加入蘑菇片, 并继续炒4分钟。

加面粉到蘑菇里并搅拌, 继续煮2-3 分钟。

在蘑菇里加入肉汤和酒, 盖上盖子小火煮20分钟。

在冷却一点后把蘑菇汤倒到搅拌机里, 然后搅拌均匀。(小心不要一次倒太多, 并确保你按下搅拌机的盖子, 因为你不希望汤从搅拌机里飞出来。)

把汤倒回锅里煮7-8 分钟。

在最后加入奶油芝士, 搅拌至融化。加入盐和黑胡椒粉调味。

我用几片蘑菇, 酸乳和欧芹装饰。


Breakfast/早餐

I would like to share some of my day to day breakfast with you, I don’t have recipes here today. You may find most of them if you search here. After all these years, I believe breakfast is the most important meal of the day now.  I eat as much as I want for breakfast, but still most of time I am eating healthy. I don’t like some of the diets saying that we shouldn’t eat this, shouldn’t touch that. Our bodies need everything, we should eat everything! The most important thing for a healthy diet is watch the portion!

IMG_9480

IMG_9525IMG_9236

WeChat Image_20180329215027

WeChat Image_20180329215020

WeChat Image_20180329215033

WeChat Image_20180405192338

WeChat Image_20180325215247

IMG_9532

WeChat Image_20180329215013

WeChat Image_20180419193247

WeChat Image_20180419193235

WeChat Image_20180419193040

IMG_9538


I love beautiful color, good presentations. I believe If you see something beautiful like above, you will want to eat them even if you don’t like any particular food. I will tell you some secrets: I don’t like boiled egg! I hate milk. I buy so much berries only because I love the colors and their looks. I hate the smell of plain yogurt. But you see everything I don’t like are here! Why? you’re asking. Well, I know they are good for me so I am eating them. In order for me to eat them happily is to make them look appealing or coming up with good recipes to make them taste delicious!  (For example I added plain yogurt and milk to berries to make beautiful smoothies which I love so much!)

So, if you don’t eat breakfast, start to get some ideas from here maybe for tomorrow morning? Ok everyone good eat, healthy life!

Braised Beef Feet Salad/卤牛脚沙拉

IMG_9457

About 4 servings, $2.5 per serving

I had never tried beef feet before. One day I saw someone posted a picture of beef feet, and she said it was pretty good. I had always wanted to try beef feet because there are many supermarkets in my neighborhood that sell it. Last weekend I went to a super market and bought 3 pounds of beef feet. Here is how I cook it.

Here is the link how to braise it: https://caiqinchen.com/2017/08/31/braise-duck%e5%8d%a4%e9%b8%ad/

Sauce:

Dark soy sauce 1tbsp

Light soy sauce 1tbsp

Water 6 tbsps

Shallot oil 1tsp

Sugar 1tsp

Minced garlic 1 clove

Scallion 1tbsp

Cilantro 2 tbsps

Hot oil 1tsp

Red chili pepper 1/2 tsp

Mix everything for sauce together

After I braise the beef feet, let cool for a hour or so. Cut the meat off the bone. ( I also braised one piece of beef shank). Keep the meat in the fridge over night. The next day cut the beef feet into smaller pieces, and the shank thin slices. Add the sauce to it, it is a cold dish if you eat it this way. If you like to eat them hot, then you don’t need any more sauce. I also added a few pieces of baby cucumber to it to get the different texture to this dish.

Beef feet have a lot of collagen because of all the hamstring, it is very good for skin, so It is my new favorite now.

IMG_9465

我以前从没试过牛蹄。有一天, 我看到有人张贴了一张煮牛蹄的照片, 她还说这个相当不错。我其实也一直想尝尝牛蹄的味道因为我家附近有很多超市都有卖。上个周末, 我去买了3磅牛蹄回家。

下面是链接如何卤它: https://caiqinchen.com/2017/08/31/braise-duck%e5%8d%a4%e9%b8%ad/

凉拌酱:

老抽1汤匙

生抽1汤匙

水6汤匙

葱油1茶匙

糖1茶匙

蒜茸1粒

葱1汤匙

香菜2汤匙

热油1茶匙

红辣椒油1/2 茶匙

把所有的调料混合在一起

在我卤好牛肉后, 放凉一小时左右。把肉从骨头上切下来。(我也卤了一条牛肉腱)。把肉放在冰箱里过夜。第二天把牛蹄切成小块, 牛腱薄切片。把调味汁浇上去就好了,这么吃这是一个冷盘。如果你喜欢吃热的, 那么你就不需要加调味汁了。我还加了一些小黄瓜来调一下不同的口感。

牛蹄有很多的胶原蛋白, 因为它有很多筋, 是美肤圣品, 现在它是我的新欢。

Kung Po Chicken/宫保鸡丁

IMG_9468

2 servings, $1.00 per serving.

Diced Chicken thigh 250g

Diced Celery 4tbsp

Diced Red bell pepper 5tbsp

Diced yellow bell pepper 5tbsps

Diced carrot 3tbsps

Diced Zucchini 5tbsps

Minced Garlic 1 clove

Dried red pepper 4 pieces

Fried peanut 5tbsps

Sauce:

Broth/water 4tbsps

Light soy sauce 1tbsp

Dark sauce 2tsps

Oyster sauce 1/2tbsp

Chicken bouillon 1/4 tsp

sesame oil a few drops

Mix everything for sauce together.

IMG_9467

Marinate the chicken thigh with 1/4 tsp salt, 1tbsp cooking wine, a few pinches of white pepper. Add 2tbsps corn starch and 2tbsps oil and mix well. Marinate the meat for a couple of hours.

Heat up a cooking pan, when it is hot, add 2 cups cold oil, only heat up a little.

Add chicken to the oil when the oil is only warm. (this will make the meat tender)

Cook chicken in the oil high heat for about 3-4 minute, when the chicken is almost done, add the vegetables to the oil and continue to cook for a minute. Use a strainer to get all the food out of the oil.

Leave only one tbsp oil in the cooking pan, add garlic and dried red pepper to it and saute for about 20 seconds.

Add the sauce to the pan bring it to boil then add the chicken and vegetables, mix well.

Add corn starch water to thicken it up a little. Add a few drops of Chinese peppercorn oil and fried peanuts.


鸡腿丁250克

芹菜丁4汤匙

红椒丁5汤匙

黄椒丁5汤匙

胡萝卜丁3汤匙

西葫芦丁5汤匙

蒜茸1粒

干红辣椒4个

炸花生5汤匙

酱汁:

肉汤/水4汤匙

生抽1汤匙

老抽2茶匙

素蚝油1/2 汤匙

鸡精1/4 茶匙

麻油几滴

把所有的调料混合在一起。

用1/4 茶匙盐, 1汤匙料酒, 一点白胡椒粉腌鸡大腿。加入2汤匙 玉米淀粉和2汤匙油, 混合均匀。把肉腌几个小时。

加热炒锅, 加2杯冷油, 只加热一点点马上加鸡肉。(这会使肉口感很嫩)

鸡在油里炸约3-4 分钟, 当鸡肉快熟的时候加其他的蔬菜到油里, 一起过一下油约一分钟。用漏勺把所有的食物从油中取出。

在锅里留一汤匙油, 加入大蒜和干红辣椒, 炒20秒左右。

把调味汁加到锅里, 然后加鸡肉和蔬菜, 拌匀。

加入玉米淀粉水勾个薄芡。加入几滴花椒油和炸花生就可以出锅了。

Roast Pork Sandwich/叉烧三明治

IMG_9384

2 servings $1.75 per serving.

I made roast pork last week again, so I ate plain roast pork, then roast pork fried rice, roast pork steam buns. After all that I still had one small piece left, I was thinking to make something different, but it wasn’t big enough for the things I wanted to make. Just when I was thinking so hard, I saw a Vietnamese menu on my table, OK I decided to make a sandwich. So this sandwich is a combination of Vietnamese, Chinese and American.

WeChat Image_20180408222934

WeChat Image_20180408222928

IMG_9345

Roast pork 1 piece

Turkey breast 12 pieces

1/2 avocado

Cilantro a few pieces

Sweet and sour carrot and white radish 8 pieces

Mayo sauce 4 tbsps.

2 rolls

Thin slice roast pork and heat it up in a skillet for 30 seconds.

Thin slice avocado.

Slice open the rolls and lightly toast.

spread the mayo sauce on one side of the rolls, then add up the rest of ingredients.

Cut the rolls in halves.

IMG_9385

叉烧一大片

火鸡胸肉 12 片

1/2个 鳄梨

香菜几片

酸甜胡萝卜白萝卜8片

蛋黄酱4汤匙。

三明治面包2 个

切成薄片的叉烧在煎锅里加热30秒。

鳄梨薄切片。

把面包片对半切开, 稍微烤一下。

把蛋黄酱涂在面包的一侧, 然后把剩下的配料加起来。

把三明治对半切开。

Zucchini bread/西葫芦面包

IMG_9422

15 servings 35 cents per serving

I had so many ripe bananas at home and I didn’t feel like to eat, so I decided to make a banana bread. But a few days ago I saw a good recipe for zucchini bread I also wanted to make too. I couldn’t decided which one to make so I made them both but in one bundt pan. 2 in 1. Great idea!!!When you pour the batter to the pan make sure you pour them together but in different sides, don’t mix them.

The zucchini bread original recipe is here:

https://www.lemontreedwelling.com/2017/03/lemon-zucchini-bread.html

Here is the link for banana walnut bread:

https://caiqinchen.com/2015/02/08/banana-bread%e9%a6%99%e8%95%89%e9%9d%a2%e5%8c%85/

I made change to the sugar, since I made 2 in 1, I do recommend to double the glaze if you make a big one like mine. This glaze tastes so good so I am willing to gain weight for it.

Ingredients

  • 1 1/2 cup all purpose flour
  • 1/2 tsp. baking soda
  • 1/4 tsp. baking powder
  • 1/4 tsp. salt
  • 1/2 cup sugar
  • 1 cup finely shredded unpeeled zucchini (do not squeeze or dry shredded zucchini)
  • 1/4 cup cooking oil
  • 1 egg
  • 2 Tbsp. lemon juice
  • 2 Tbsp. lemon zest

Glaze

  • 1/2 c. powdered sugar
  • 1 Tbsp. lemon juice
  • 1 tsp. lemon zest
  • *glaze can be doubled if desired

Instruction


  • In a medium mixing bowl combine flour, baking soda, baking powder, and salt; set aside.
  • In a separate mixing bowl combine sugar, zucchini, cooking oil, egg, lemon juice, and lemon zest. Stir to combine.
  • Add dry ingredients to zucchini mixture; stir just until combined.
  • Spoon batter into greased bread pan
  • Bake at 350 degrees for 50-55 minutes or until golden brown and set.
  • Cool in pan on a wire rack 15 min, then remove from pan and cool completely.
  • Once cool, combine ingredients for glaze and drizzle over bread.

IMG_9419

Zucchini Bread

IMG_9431

Banana with walnut bread

IMG_9438.JPG

Roasted Vegetables/烤时蔬

I made a real simple meal tonight after watching a video. I didn’t expect this dish to be this good; it turned out to be not only delicious but also beautiful. So if you want to wow someone but doesn’t want to spend a lot of time in the kitchen this is a good choice.

I didn’t really measure ingredients because I didn’t think I would post it here. So I will tell you what I used without amount. Some colorful vegetables that are good for roasting, anything you have in your fridge. Olive oil, salt, black pepper and little bit of balsamic vinegar.

Cut all the vegetables even in size,place them evenly on a baking sheet.

Sprinkle salt, black pepper, olive oil and drizzle a little bit of balsamic vinegar.

Bake in preheated oven 425F for 20 to 25 minutes. (adjust time accordingly if you make more)

IMG_9365

IMG_9358

IMG_9351

IMG_9366

IMG_9347

IMG_9350

我最近想减肥,所以晚上吃的很清淡。前几天看了一个视频是烤时疏就想做因为我家正好也很多蔬菜。 我没想到做出来不仅好吃还好看。

因为没有想到要摆到这来所以就没有测量用量,但是这道菜很简单,我跟你们说说材料也是一样的。 把家里颜色好看适合烤的蔬菜拿来做就对了。盐,黑胡椒粉,橄榄油外加一点点的香醋。

菜切成大小差不多的块。

在烤盘里均匀摆开,撒上盐,黑胡椒粉,橄榄油和一点点的香醋。

放入预热好425华氏度的烤炉中烤大概20 到25 分钟。如果烤的多要相对调整时间。


Thin Noodle Soup/面线糊

IMG_9314

This thin noodles soup has been my all time favorite. I had posted something similar before, but I did some changes to make it even better this time.

I braised the meat before hand. I used pork intestine, two different part of beef trips. Here is the recipe for braise meat:

https://caiqinchen.com/2017/08/31/braise-duck%e5%8d%a4%e9%b8%ad/

Here is the recipe how to make this noodles soup dish:

https://caiqinchen.com/2016/12/06/thin-noodles-soup%e5%8f%8c%e8%82%9a%e9%9d%a2%e7%ba%bf/

Basically I braised the meat first, then added some of the sauce used to braise the meat to the broth ( you can use any kind of broth or even just water). Precooked the thin noodles in a separated cooking pan, then added to the soup. I thickened my soup using water chestnut starch this time because it keeps the soup thick even if I heat it up the next day. Simply delicious!!!

我之前也煮过类似的面糊,我超级喜欢吃。 这次我改了一点点的做法让面糊更好吃。

我事先先把肉都卤过了。 我用了猪大肠,牛百叶,还有牛肚。做法看接连:

https://caiqinchen.com/2017/08/31/braise-duck%e5%8d%a4%e9%b8%ad/

这里是煮面的接连

https://caiqinchen.com/2016/12/06/thin-noodles-soup%e5%8f%8c%e8%82%9a%e9%9d%a2%e7%ba%bf/

我把要用的肉都事先卤过。 加一点卤肉的汤汁到肉汤里(你可以用自己喜欢的肉汤,用水也可以)。 面线在另外的锅里煮熟后加到肉汤里。我这次用马蹄粉勾芡因为用马蹄粉勾芡的汤就算第二天再回锅热一次吃还是很粘稠。总之就是很好吃就对了。

WeChat Image_20180405192940

Clam Chowder/蛤蜊浓汤

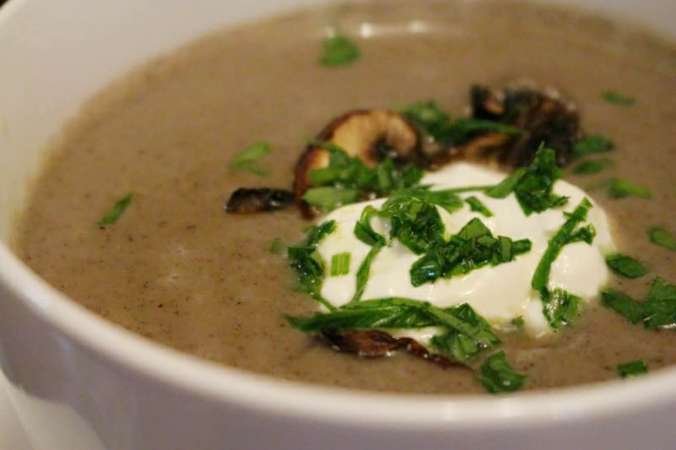
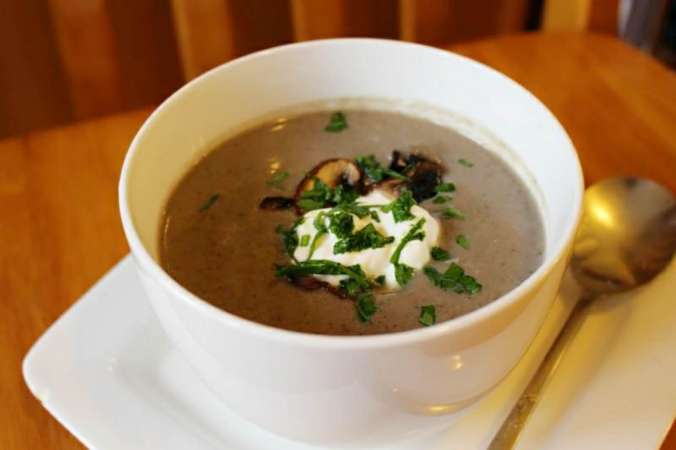
I used to cook this dish very often, then I stopped for years not cooking it. ( I don’t know why) And just last week, I went to Costco and saw this beautiful little clams; I was thinking: ” this can make really good clam chowder” !!! So I bought a bag of it. And here is the soup I made, so rich, creamy and flavorful!

WeChat Image_20180404210837

4 servings $5.75 per serving.

5 pounds clam

6 cups water

2 stalks celery diced

One small carrot diced

One small yellow onion Diced

½ Leek thin sliced

2 small potatoes cubed

1 cup Half and half

1 cup whole milk

Butter 2 tbsps

Flour 1/3 cups

WeChat Image_20180404210831

Clean the clams well. Cook the clams in the water until the clams open (discard any that do not open). Pick the meat out and discard the shells. Collect all the juice in a separated container. Roughly chop the clams.

Add 2 cubes of herb olive oil and 2 tbsps. unsalted butter in a big skillet.

Add vegetables to the oil and sauté for 10 to 15 minutes or until the vegetables are tender, sprinkle the flour to the vegetable and mix well.

Add clam juice to the vegetables cup by cup (don’t add all of the juice at once), add additional clam juice after you stir together vegetables with the clam juice.

Bring it to boil, then reduce the heat to small, continue cooking for 20 minutes.

Add half and half, milk and Clam meat to the soup then turn the heat to high and bring everything to boil.

Season with black pepper and little bit of salt (I don’t use more salt because the clam juice is salted naturally)

Garnish the dish with bacon and chives/parsley if you desire.

If you don’t have herb olive oil, just use 2 tbsps. olive oil with 2 pieces of bay leaves.

Home made herb cube:

  • I sometimes buy too much herbs, and I can’t use all of them.  So I am using this method to save them for later.
  • Pick all the leaves from the herb, then put them in the ice cube container, pour some good quality extra virgin olive oil over them, then freeze them.
  • Save all the herb cubes in a zip lock bag in the freezer, so when you need some herb for cooking later, you can always get one.

WeChat Image_20180104214355

WeChat Image_20180404210844

5磅蛤蜊

6杯水

2柄芹菜 切丁

一个小胡萝卜切丁

一个小的黄洋葱 切丁

½条大蒜苗 切薄片

2个小土豆切丁

1杯咖啡奶

1杯全脂牛奶

黄油2汤匙

面粉1/3 杯

把蛤蜊洗干净。在水里煮 直到蛤开壳(丢弃不开的)。把肉挑出来扔掉壳。 把汁倒到一个容器里, 粗略地切一下蛤蜊。

在一个大锅加入2块香料橄榄油和2汤匙牛油。

把蔬菜加到油里炒10到15分钟, 或者等到蔬菜都软了, 把面粉洒到蔬菜上拌匀。

在蔬菜中加入蛤蜊汁 (不要一次把所有的汁都倒进去,一杯一杯的加), 将蛤蜊汁与蔬菜搅拌均匀后加入更多的汁。

煮开, 然后把火调小, 继续煮20 分钟。

添加咖啡奶,牛奶 和蛤蜊肉, 把火调高, 然后煮开。

加黑胡椒和少许盐 (我没加更多盐, 因为蛤汁自然带咸味的)

如果您喜欢加点煎过的熏肉和韭菜或欧芹装饰。

如果你没有香料橄榄油, 只需用2汤匙橄榄油与2片月桂叶。

WeChat Image_20180404210821

自己做的香料油


  • 在一個不粘鍋里煎培根直到脆。把它們放在廚房纸上, 以吸收多余的油。切成小塊備用。
  • 加入1汤匙 黃油和香料油放入鍋中, 加入洋蔥和大蒜炒2分鐘。
  • 加土豆繼續煮3分鐘
  • 加入雞湯 (幾乎覆蓋住就好了不需要太多的湯) 蓋上蓋子繼續煮 5-7 分鐘, 直到土豆软烂。
  • 用搅拌机把汤搅成泥好然後倒回鍋裡加入牛奶繼續小火煮到它再次煮开。加入黑胡椒和鹽來調味。
  • 用一些切達乾酪、熏肉、歐芹或蔥來裝飾湯。