Cinnamon Rolls/肉桂包

IMG_4992

IMG_4986

20 servings $0.35 per serving

Here is the original recipe:

Ingredients

  • 1 cup (240 mL) whole milk
  • 4 tablespoons unsalted butter, 1/2 stick
  • 0.75 oz (20 g) instant yeast, 1 packet
  • ⅓ cup (65 g) granulated sugar
  • ¼ teaspoon salt
  • 3 ripe bananas, mashed
  • 4 ½ cups (560 g) all-purpose flour, divided
  • 2 tablespoons oil

Filling

  • 5 tablespoons unsalted butter, melted
  • 1.5 tablespoon cinnamon

Caramel Sauce

  • ½ cup (115 g) unsalted butter, 1 stick
  • 1 cup (220 g) brown sugar
  • 1 teaspoon salt
  • 1 teaspoon vanilla
  • ¼ cup (85 g) honey
  • 1 cup (100 g) walnuts, chopped

Preparation

  1. In a large, microwave-proof bowl, combine the milk and melted butter. Microwave for 40 seconds, until the milk mixture reaches 110˚F (45˚C). Add the yeast, then let sit for 10 minutes.
  2. Add the granulated sugar, salt, mashed bananas and stir.
  3. Add 3½ cups (435 g) of flour, ½ cup (60 g) at a time, stirring between each addition.
  4. Transfer the dough to a floured surface and knead for 3 minutes, adding more flour ¼ cup (30 g) at a time if the dough is sticking to your hands or the surface. Form the dough into a ball.
  5. Add the oil to clean large bowl and place the dough in the bowl. Cover with a kitchen towel and let rise for in the refrigerator for at least 3 hours, or overnight, until doubled in size.
  6. Once the dough has risen, roll it out to a ¼-inch-thick (6-mm) rectangle about 18×12 inches (20×30 cm).
  7. Make the filling by mixing the melted butter and cinnamon together in a small bowl.
  8. Spread the filling evenly over the dough. Roll up the dough and slice into 20 even pieces。
  9. Make the caramel sauce: In a small saucepan over medium heat, combine the butter, brown sugar, salt, vanilla, and honey. Keep stirring to prevent the sugar from sticking to the pan. Bring to a gentle boil, then remove the pan from the heat.
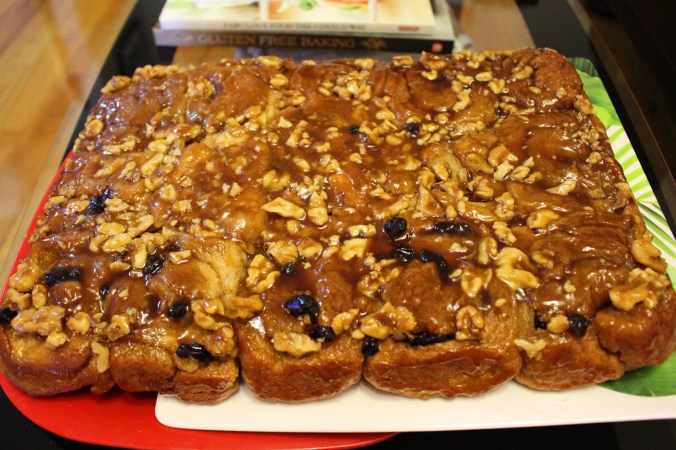
  10. Pour the caramel sauce into a 9×12-inch (23×30-cm) baking dish and sprinkle the walnuts on top of sauce. Arrange the rolls in the dish so there are 4 rows of 5 rolls.
  11. Cover with plastic wrap and let the rolls rise for 15 minutes, in a warm place.
  12. Preheat the oven to 350˚F (180˚C).
  13. Remove the plastic wrap and bake the cinnamon rolls for 40 minutes, or until lightly golden brown.
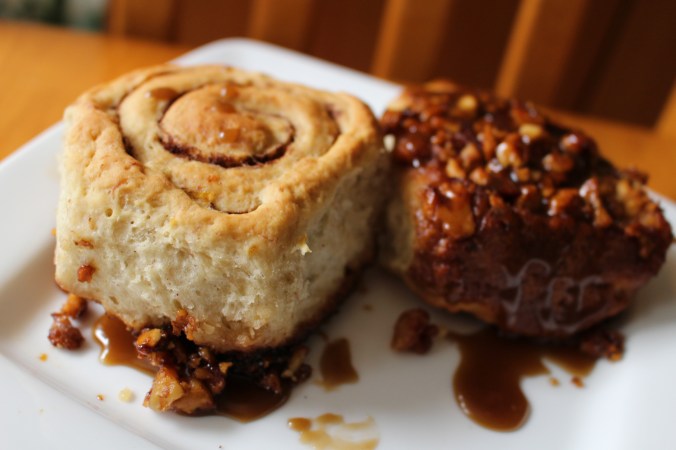
  14. Let cool for 20 minutes, then invert the rolls onto a serving platter.

IMG_0198

20份每份0.35美元

以下是原创食譜:

https://tasty.co/recipe/upside-down-banana-bread-cinnamon-rolls

成分:

1杯 (240 毫升) 全脂牛奶

4汤匙盐黄油, 1/2 条

0.75 盎司 (20 克) 快速发酵酵母, 1 包

⅓杯 (65 克) 砂糖

¼茶匙盐

3条熟香蕉, 压成泥

4½杯 (560 克) 面粉

2汤匙油

夹层酱:

5汤匙无盐黄油, 融化

1.5 汤匙肉桂粉

焦糖酱:

½杯 (115 克) 无盐黄油, 1 条

1杯 (220 克) 红糖

1茶匙盐

1茶匙香草精

¼杯 (85 克) 蜂蜜

1杯 (100 克) 核桃, 切碎

制作:

  1. 在一个大的碗里放入牛奶和融化的黄油。微波40秒, 直到牛奶混合物达到 110˚F (45˚C)。加酵母, 然后静置10分钟。
  2. 加入砂糖, 盐, 香蕉泥和搅拌。
  3. 加3½杯 (435 克) 面粉,一次 ½杯 (60 克) , 一边搅拌一边添加。
  4. 把面团转移到桌面上 揉3分钟, 一边再每次¼杯 (30 克) 加入更多的面粉。把面团揉成一个球。
  5. 加油在一个大碗内, 把面团放在碗里。用厨房毛巾盖住, 在冰箱里放3小时, 或隔夜直到大小加倍。
  6. 面团擀成¼英寸厚 (6 毫米)的矩形18×12 英寸 (20×30 厘米)。
  7. 将融化的黄油和肉桂粉混合在一个小碗里, 用于做馅料。
  8. 将馅料均匀地涂在面团上。卷起面团, 切成 20份。
  9. 做焦糖酱: 小锅中加热, 将黄油、红糖、盐、香草和蜂蜜结合在一起。保持搅拌, 防止糖粘到锅里。小开的时候就离火。
  10. 将焦糖酱倒入9×12 英寸 (23×30) 的烤盘中, 将核桃撒在酱汁上。在盘子里放上肉桂卷, 这样有4排,每排5个卷。
  11. 盖上塑料保鲜膜, 在一个温暖的地方二次发酵15分钟。
  12. 将烤箱预热至 350˚F (180˚C)。
  13. 取下塑料膜, 烘烤肉桂卷40分钟, 或直到淡褐色。
  14. 冷却20分钟, 然后倒扣在一个大碗里。

Cucumber Salad/凉拌小黄瓜

IMG_0171.JPG

Total $1.75

English cucumber 1

Sweet chili Sauce:

Thai sweet chili sauce 1tbsp

Water 2 tbsps

Sugar 2tsps

Rice Vinegar 1.5tbsps

Garlic 1 clove (minced)

Salt ½ tsp


Savory sauce:

Soy sauce 3tbsps

Shallot oil 1tbsp

Chicken Bouillon 1/2tsp

Balsamic vinegar 1tbsp

Garlic 2 cloves(minced)

Hoisin sauce 2tsp

Sugar 1/2 tbsp

IMG_0082

Mix the ingredients for sauce together and mix well.

Peel some of the skin off the cucumber to make it look prettier.

Cut 90 degrees straight down to 2/3 the wide of the cucumber on one side.

Turn the cucumber to the other side and cut 45 degrees tilted down to 2/3 the wide of the cucumber on the other side.

Pour 2-3 cups of water to a big bowl, add 2tsps salt and dissolve.  Leave the cucumber we just cut in the water for 15 minutes.

Get the cucumber out of salted water and gently squeeze the excess water.

Circle the cucumber in a plate the pour the sauce over it.

This is a super healthy and delicious dish for hot summer. You can make different kind of dressings for it. When you cut the cucumber, make sure don’t cut it through if you want to impress others. The first time when I made it, I cut it a little to thick so it didn’t look as pretty as the second one.

WeChat Image_20180527100525

总共$1.75美元

英国小黄瓜1条

甜酱:

泰国甜辣酱1汤匙
水2汤匙
糖2茶匙
米醋1.5汤匙
大蒜1粒 (碎)

盐½ 茶匙

咸酱:

酱油3汤匙

葱油1汤匙

鸡精1/2 茶匙

香醋1汤匙

大蒜2粒 (切碎)

海鲜酱2茶匙

糖1/2 汤匙

IMG_0169
把酱汁调味料混合在一起, 拌匀。

刮掉黄瓜上的一些皮, 使它看起来更漂亮。
在黄瓜的一面以90度直切黄瓜至2/3 的宽度。
把黄瓜转到另一边, 以45度斜切黄瓜到 2/3的宽度。
倒2-3 杯水到一个大碗里, 加入2茶匙盐搅拌溶解。 把黄瓜放在水里15分钟。
把黄瓜从咸水中取出, 轻轻地挤掉多余的水。
把黄瓜盘放在盘子里倒上酱汁。
炎炎夏日这是一个超级健康和美味的凉拌菜。你可以做不同的酱汁来陪它。当你切黄瓜的时候, 小小不要把它切断。我第一次做的时候, 我切的有点厚, 所以它看起来不如第二个那么漂亮。

Seaweed Salad

IMG_0019.JPG

Everyone knows seaweed is very good to our health, but to be honest with you, I don’t really cook seaweed because it requires a lot of time to cook. However my neighbor brought me this cooked dried seaweed saves all the troubles for me. All I need to do is soak it in boiling water for a few minutes, and it is ready to eat. I will try to cook it with ribs next time! Yum! If you can’t find this from supermarket, cook the seaweed first then do this salad. It may take your more time, but it is totally worth! It has the fresh sea flavor in this dish and it is so healthy (recommended for diet).

Dried cooked seaweed 20g

Soy sauce 3tbsps

Shallot oil 1tbsp

Chicken Bouillon 1/2tsp

Balsamic vinegar 1tbsp

Garlic 2 cloves(minced)

Hoisin sauce 2tsp

Sugar 1/2 tbsp

Add 2 cups boiling water to the dried seaweed and soak for 5-10 minutes, then rinse.

Mix all the ingredients for sauce together and mix well.

pour the sauce over the seaweed, add some cilantro and scallion for more flavor.

IMG_0113

干熟海藻20克

酱油3汤匙

葱油1汤匙

鸡精1/2 茶匙

香醋1汤匙

大蒜2粒 (切碎)

海鲜酱2茶匙

糖1/2 汤匙

将2杯沸水倒入干海藻中浸泡5-10 分钟, 然后冲洗。

把所有的调味料混合在一起。

将酱汁倒在海藻上, 加入一些香菜和葱来调味。

Happy Mother’s Day meals/母亲节餐单

Today is mother’s day, wish all the mothers a happy holiday! I made my mother a simple breakfast and a fancier dinner. Hope you all like them.

My mother has pollen allergy like a lot of other people, so I usually don’t buy any fresh flowers for her on mother’s day. Here are some strawberry roses I made for her. I think this is pretty awesome because not only they are pretty, we can also eat them as dessert.

IMG_9931

Breakfast

IMG_9943

IMG_9938

Dinner

Shrimp rolls

https://caiqinchen.com/2016/03/27/spring-rolls%e6%98%a5%e5%8d%b7/

IMG_9978

Walnut shrimp

https://caiqinchen.com/2015/02/22/walnut-shrimp%e6%a0%b8%e6%a1%83%e8%99%be/

IMG_9979

Braised pork belly

https://caiqinchen.com/2015/07/24/pork-belly-stew%e7%ba%a2%e7%83%a7%e8%82%89/

IMG_9975

Chicken corn with mixed peas and pine nuts

https://caiqinchen.com/2014/09/15/corn-with-pine-nuts%e7%8e%89%e7%b1%b3%e8%99%be%e7%82%92%e6%9d%be%e4%bb%81/

IMG_9971

Rice cake with crab

https://caiqinchen.com/2015/11/07/seafood-rice-cake%e6%b5%b7%e9%b2%9c%e7%82%92%e5%b9%b4%e7%b3%95/

IMG_9963

Crab tofu soup

IMG_9970


ShaXian Wonton & Noodles With Peanut Butter Sauce/沙县扁肉拌面

IMG_9824.JPG

These two are very famous Fujianese Snacks. We call them snack, but they look more like a meal. These two have to be eaten together. Shaxian is a small town in Fujian province that is very famous for different kind of snacks. Fuzhounese wonton is not nearly as good as this one because the way the meat is processed. The meat in Shaxian wonton is much bigger and much more elastic.

IMG_9859

IMG_9864

ShaXian Wonton

Lean pork (meat from pig’s leg is preferred) 5oz.

Fuzhounese wonton skin 40- 50 pieces

Broth 4 cups

Cut pork into big thick slices, cut all the fascia off the meat, sprinkle 1/2 tsp baking soda over the meat, then use a hammer meat tenderizer to gently strike the meat for one hour. (Yes ONE hour)

Add 1/3 tsp salt, 1/3 tsp chicken bouillon, 2 pinches white pepper, 1/2 tsp dark soy sauce and 5 tbsps cold water to the meat and mix well.

Get 1 tsp of meat and wrap it with a piece of wonton skin. Since the wonton skin is super thin, all we need to do just pinch them together.

Bring a pot of water to boil, then cook the wontons in the boiling water for 3 minutes. Adjust the time according to your wonton’s meat size.

Divide the wontons to 3 different bowls, then add the broth (boil in a separated cookware. Add salt, white pepper, sesame oil and white vinegar to the broth) Then garnish with scallion.

瘦肉 (猪腿肉优先) 5 安司

福州扁肉皮 40-50 片

肉汤4杯

把猪肉切成大厚片, 切掉肉上的所有筋膜, 在肉上洒1/2 茶匙的苏打, 然后用锤肉的锤子轻轻地把肉锤打一小时。(是的一小时)

加入1/3 茶匙盐, 1/3 茶匙鸡肉精, 适量白胡椒, 1/2 茶匙老抽, 5 汤匙冷水, 拌匀。

拿1茶匙的肉, 用一块扁肉皮包起来。因为扁肉皮超薄, 我们需要做的只是轻轻捏一下就会粘在一起了。

煮沸一锅, 然后在沸水中煮扁肉3分钟。根据你扁肉的肉大小调整时间。

将扁肉分到3个碗里, 然后加入汤 ( 在另一个锅里煮开。将盐、白胡椒、芝麻油和白醋加入汤中, 然后用葱装饰。

WeChat Image_20180507210803

IMG_9814

Noodles With Peanut Butter Sauce

Thick wonton Noodles 8 oz.
Pork fat 2tbsps

Light soy sauce 2tbsps

Shallot oil 2tsps

Chicken bouillon 1tsp

Scallion 2tbsps

Peanut butter 2tbsp


Cook the noodles in boiling water for about 7-8 minutes, then take them out of water and put them in a big bowl.

Add the rest of ingredients to the noodles and mix well. You may need to add some water that you use to cook the noodles because this kind of noodle will absorb a lot of liquid.

馄饨面8盎司。
猪油2汤匙

生抽2汤匙

葱油2汤匙

鸡精1茶匙

葱花2汤匙

花生酱2汤匙


面条在沸水中煮7-8 分钟, 然后把它们从水里捞出来放进一个大碗里。

将剩下的配料添加到面条中, 拌匀。你可能需要添加一些你用来煮面条的水, 因为这种面条会吸很多水。


Related image


Cabbage Saute With Vinegar/醋呛包菜

IMG_9834.JPG

3 servings, $0.6 per serving

Taiwanese cabbage 750g

Shredded carrot 2tbsps

Garlic 2 cloves (minced)

Scallion 1 piece


Direction:

Cut cabbage。

Preheat a skillet then add 3 tbsps cooking oil to the skillet, add all the vegetables to the skillet.

Saute the vegetables for 3 minutes, add 1/2 tsp salt, 1/2 cup broth or water to the vegetables. Cover with a lid and cook for 7 more minutes.

Add 2tsps sugar, 1.5 tbsps white rice vinegar, 1/2 tsps chicken bouillon to the vegetables and mix well.

This is one of my favorite vegetables, I like Taiwanese cabbage because it is not as hard as the regular cabbage. Also it doesn’t require as much time to cook it. Adding vinegar and sugar to it can bring out more sweetness of the vegetable. If you like it softer, cook 2 more minutes. Give it a try and you are going to love it. It is delicious and healthy!

3 份,每份$0.6

臺灣捲心菜/高丽菜750克

胡蘿蔔絲2汤匙

大蒜2粒 (切碎)

蔥1条

做法:

捲心菜切片。

預熱一個炒鍋, 然後加3湯匙烹調油, 加入所有的蔬菜。

將蔬菜炒3分鐘, 加入1/2 茶匙鹽, 1/2 杯清湯或水。蓋上蓋子, 再煮7分鐘。

加2茶匙糖, 1.5 湯匙白米醋, 1/2 茶匙雞肉精蔬菜拌勻。

這是我最喜歡的蔬菜之一, 我喜歡臺灣捲心菜, 因為它不像普通捲心菜那麼硬。而且它不需要太多的時間來烹調它。添加醋和糖, 可以帶出更多的蔬菜甜味。如果你喜歡它更軟一些, 多煮2分鐘。嘗試一下你會喜歡它的。它既美味又健康!

Baked Chicken Drumsticks/烤鸡腿

IMG_9799

6 servings $0.5 per serving

Ingredients
  • 1/3 Cup Oil
  • Juice of One Lemon
  • 3 cloves garlic (roughly chopped)
  • 2 cloves shallot (roughly chopped)
  • 2 Teaspoons Salt
  • 1/4 Cup light Soy
  • 1/4 Cup Brown Sugar
  • 1 Teaspoon Black Pepper
  • 1 Teaspoon Paprika
  • 1 table spoons oyster sauce
  • 2 table spoons honey
  • 6 Chicken Drumsticks
Instructions


1. In a bowl whisk together all the spices and sauce with the garlic and shallot.


2. Add the chicken drumsticks to a large zip-top bag and pour 2/3 the marinade over the chicken.  Close the bag and massage the marinade into the chicken for a few seconds.


3. Refrigerate the chicken in the marinade overnight for a better flavor.


4. Preheat the oven to 425 F degrees.  Line a large baking sheet with foil and spray with cooking spray.


5. Arrange the chicken in an even layer on prepared baking sheet and bake in the preheated oven for 15 minutes.

6. Take the chicken out and brush the meat with some of the leftover sauce. Bake for 10 more minutes.

7. Take the chicken out again, flip the chicken and brush the sauce one more time cook for an additional 10 minutes or until the center of meat reach 170F.

一共6份,每份0.5 元
成分:

1/3 杯油
一个檸檬的汁
3粒蒜 (切碎)
2粒红蔥头 (切碎)
2茶匙鹽
1/4 杯生抽
1/4 杯紅糖
1茶匙黑胡椒粉
1茶匙辣椒粉
1汤匙蠔油
2汤匙蜂蜜
6个雞腿

做法:

1. 在碗裡加大蒜和红蔥头把所有的香料和調味汁攪拌在一起。

2. 將雞腿放入一個大的拉鍊袋里, 然後將2/3 的醃料倒入雞肉上。 把袋子拉上, 把醃料汁按摩到雞肉裡幾秒鐘。

3. 將雞肉放在醃料中冷藏过夜風味最佳。

4. 預熱烤箱至 425 F 度。 用箔纸将烤盘铺一下,再喷一点的油在锡纸上这样鸡肉就不会粘在上面了。

5. 均勻排列雞腿在铺了锡纸的烤盘上, 在預熱好了的烤箱中烘烤15分鐘。

6. 把雞肉拿出來, 用剩下的調味汁刷在肉上。再烤10分鐘。

7. 再次把雞肉拿出來翻个面,把雞肉再刷一遍调味汁, 再烤10分鐘, 或者直到肉的中心達到170F

IMG_9792

Curry Fried Rice/咖喱炒饭

IMG_9627.JPG

I love fried rice very much, so I make it quite often. It is pretty much the same each time, so I don’t post all of them. But this one is a little different, I added some curry powder at the end and the rice tasted so much better. I really like the smell of it, so fragrant!

Here is the link to fried rice, just add the curry powder at the end, and everything else is pretty much the same.

https://caiqinchen.com/2016/04/03/pineapple-fried-rice%e5%87%a4%e6%a2%a8%e7%82%92%e9%a5%ad/

Here is the curry powder I used.

Image result for kim tu thap 咖喱粉

我非常喜欢炒饭, 所以我经常做。每次都差不多, 所以我不会全部张贴。但是这个有点不同, 我在最后加了一些咖喱粉, 米饭尝起来好吃多了。我真的很喜欢它的味道, 那么香!

这是一个炒饭链接,只是最后加咖喱粉其他的都差不多。我用的是上面这个咖喱粉。

https://caiqinchen.com/2016/04/03/pineapple-fried-rice%e5%87%a4%e6%a2%a8%e7%82%92%e9%a5%ad/

Piggy In The Mud Chocolate Cake/粉猪戏泥巧克力蛋糕

IMG_9699

$20 for the whole cake

So yesterday was my mother’s birthday, I was thinking what kind of cake I was going to make for her since early April. I couldn’t decide until I saw someone posted a piggy in the mud cake. My mother’s Chinese horoscope is pig, so this is perfect for her birthday. I underestimated the difficulty of making this cake because I had make chocolate cake before. I was thinking this should be easy just a few marzipan pigs!!! So here is my cake without the kitkat around it because I was trying to be healthy ( we don’t like anything too sweet ). It looks kind ugly without the kitkat and the piggies are not very good looking either, anyhow I did my best! The thoughts count!!! My mother was really happy!!!

My mother and I each ate one piece, and the rest go to my neighbor’s kids.

Here is the link to the chocolate cake:

https://caiqinchen.com/2016/05/01/chocolate-cake%e5%b7%a7%e5%85%8b%e5%8a%9b%e8%9b%8b%e7%b3%95/

Here is the link to the piggy in the mud instruction:

http://www.finecraftguild.com/kit-kat-birthday-cake-pigs-in-mud-recipe/

IMG_9688

IMG_9708

整个蛋糕大概$20.

昨天是我妈妈的生日, 从四月份开始我就琢磨着为她做什么蛋糕。直到看到有人做了一个粉猪戏泥的蛋糕后我才决定要做一个一样的。我妈妈是属猪的, 所以这应该她的完美生日蛋糕。我低估了制作这个蛋糕的难度, 因为我以前做过巧克力蛋糕。我想这应该是很简单的, 只是多做几只杏仁糖猪而已!!!所以这里是我的蛋糕没有kitkat围着的, 因为我想健康一点所以没用kitkat (我们不喜欢太甜的东西)。现在它看起来有点丑而且小猪也不是很好看,但是无论如何我已经尽力了!心意到了!!!而且我妈妈真的很开心!!!

我妈妈和我每人各吃了一块, 剩下的就给我邻居的孩子们吃了。

这是巧克力蛋糕的链接:

https://caiqinchen.com/2016/05/01/chocolate-cake%e5%b7%a7%e5%85%8b%e5%8a%9b%e8%9b%8b%e7%b3%95/

下面是在泥浆小猪的链接:

http://www.finecraftguild.com/kit-kat-birthday-cake-pigs-in-mud-recipe/

IMG_9672

IMG_9700.JPG