Cream Cheese Filling Chocolate Cake/巧克力乳酪夹层蛋糕

IMG_3860

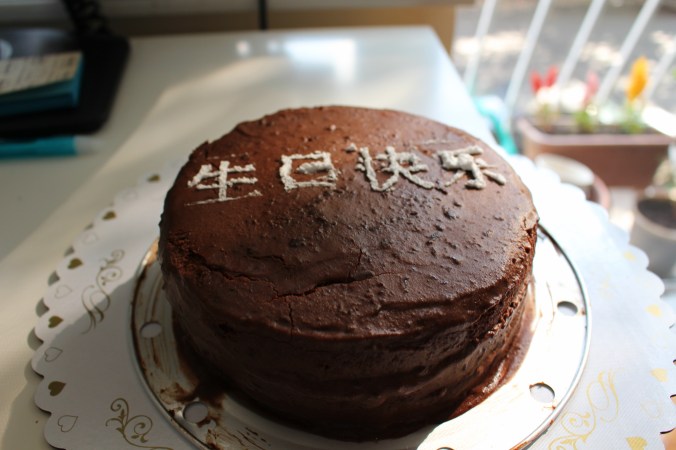
这是我根据君之的方子做了一些改动后做出的蛋糕, 非常好吃。最近不停的做巧克力蛋糕, 要换一换口味了。 哈哈哈哈。。。 下次一定做别的。

原方在此: http://blog.sina.com.cn/s/blog_4a5089ff0100g8jb.html

配料
巧克力蛋糕:面粉120克,可可粉25克,中号鸡蛋3个,细砂糖120克,黄油135克,泡打粉4克,小苏打1克,香草精1/2小勺
乳酪奶油:牛奶100克,细砂糖60克,蛋黄1个,低筋面粉5克,玉米淀粉5克,香草精1/4小勺,奶油奶酪140克,黄油65克
糖浆:水75克,细砂糖60克,朗姆酒25ML

巧克力浆︰½ 杯奶油,1 杯巧克力片,1 湯匙軟化黃油 可選不放

烤箱预热到375F度/190C 度

制作过程:
1、把鸡蛋打入碗里,加入细砂糖,鸡蛋打散即可,不要打发。
2、加入香草精。
3、低筋面粉、可可粉、泡打粉、小苏打混合后筛入鸡蛋里。
4、用橡皮刮刀拌匀成面糊。
5、黄油切成小块,隔水加热融化,趁黄油温热的时候,倒进面糊里。
6、继续翻拌,使黄油和面糊混合均匀。

7、将面糊倒入喷了油的7寸烤盘里,并用刮刀抹平。把烤盘放进预热好的烤箱,烤30-40分钟左右,牙签插入后抽出没有面糊即可。烤好后放烤盘里凉10分钟后倒出放架子上凉透。
8、接下来制作乳酪奶油馅。蛋黄用打蛋器打到浓稠,颜色略发白。
9、低筋面粉和玉米淀粉混合过筛入蛋黄糊里。
10、轻轻搅拌,使面粉和蛋黄糊混合均匀。
11、牛奶加糖,倒入奶锅里煮至沸腾。把煮沸的牛奶缓缓的倒1/3入第三步做好的蛋黄面糊里。边倒边不停的搅拌,防止蛋黄面糊结块。
12、把1/3的牛奶倒入蛋黄面糊并搅拌均匀后,把搅拌好的蛋黄面糊全部倒回牛奶锅里。并轻轻拌匀,加入香草精。
13、奶锅重新用小火加热,边加热边不停搅拌,直到面糊沸腾,变得浓稠后,立即离火。这个时候马上在煮好的蛋乳泥里加入奶油奶酪,不停的搅拌直到奶酪受热后变得软化,并完全和蛋乳泥混合在一起,成为光滑细腻的状态。放至完全冷却。
14、黄油软化以后,用打蛋器打发,直到体积膨松,颜色发白。

15、把第13步煮好的奶酪蛋乳泥倒入黄油里,用橡皮刮刀拌匀。
16、一直翻拌到均匀、光滑的状态,乳酪奶油馅就做好了。
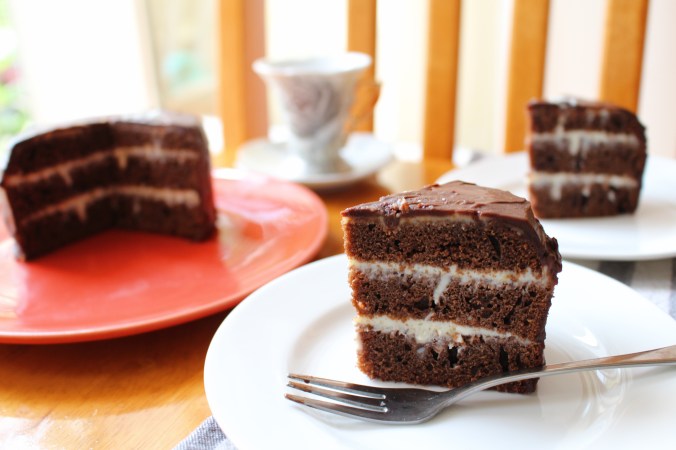
17、把烤好的巧克力蛋糕,切成均匀的3 片。取一片蛋糕片,在表面和侧面都刷上足量的糖浆,使蛋糕完全湿润。
18、乳酪奶油均匀的涂在蛋糕片上, 盖上第二片蛋糕难后依次在涂上乳酪奶油直到把蛋糕做好。

19,放巧克力在一個小鍋裡,把奶油烧到冒小泡,注意不要燒開。熱奶油倒入巧克力混合。然後混勻直至表面光滑。拌入黃油來添加一些亮度。

20,当朱古力浆还没凝固时倒蛋糕上抹平。

21、做好的蛋糕,放进冰箱冷藏一晚,口味更佳。

IMG_3842

This cake is based on 君之’s recipe. I make some changes.

Original recipe is here: http://blog.Sina.com.CN/s/blog_4a5089ff0100g8jb.html

Ingredients:

Chocolate cake: cake flour 120g, 25g of cocoa powder, 3 medium eggs, sugar 120g, 135g of butter, baking powder 4g, 1g of baking soda, vanilla extra 1/2 teaspoon

Cream Cheese filling: milk 100g, sugar 60g, 1 egg yolk, cake flour 5g, 5g of corn starch, vanilla extra1/4 spoon, cream cheese 140g, butter 65g

Syrup: water 75g sugar 60g, rum 25ML

Mix water and sugar in a small pot and heat up until sugar melt add rum and let it cool down.

Chocolate ganache: ½ cup butter, 1 cup chocolate chips, 1 Tablespoon butter

Preheat oven to 375F degrees/190C degrees

Direction:

1, In a bowl, add sugar, eggs, and mix well.

2, Add vanilla extra.

3, Mix cake flour, cocoa powder, baking powder, baking soda and filter into egg yolks mixture.

4, Mix everything into batter with a spatula

5, Cut the butter into small pieces, melt it. While butter is still warm, pour it to the batter.

6, Continue to mix until well combined.

7, Sprayed oil to a 7-inch spring form baking pan then pour the batter into it. Put the baking pan into the preheated oven and Bake 30-40 minutes, inserted a toothpick into the cake if it comes out clean then the cake is ready.  Leave the cake inside baking pan and cool for 10 minutes, then take it out and cool it on a rack.

8, For cream filling, beat egg yolks with whisk until thickened and color turns slightly white.

9, Sift together the cake flour and corn starch into egg yolks.

10, Gently stir the flour and egg yolk together.

11, Pour milk and sugar in a pot and bring to boil. Pour 1/3 of milk slowly to egg yolk batter.  Stir constantly to prevent any clotting.

12, Pour the batter back to the milk pot. Add vanilla extra and stir slowly.

13, Heat milk pan over low heat and stir constantly until batter is boiling, immediately remove from heat when thicken. Add cream cheese, keep stirring until cheese melts into the batter and becomes very smooth.  Cool completely.

14, After the butter soften, whisk until fluffy and the color turns white.

15, Add the batter from step 13 to the butter, and mix well with a rubber spatula, mix until uniform, smooth, then cream filling is ready.

16, Slice the chocolate cake into 3 even slices. Take a piece of cake and brush enough of syrup on the surface and make sure the cake is moist.

17, Evenly spread cream cheese filling on the cake, add the second piece and repeat the process until the cake is built up.

18, Place chocolate in a little bowl, add cream to a pot and bring to bubbling, be careful not boil. Pour hot cream to the chocolate and mix well until the surface is smooth. Stir in butter for brightness.

19, Pour the chocolate to the cake’s surface and use a spatula to smooth the surface. Keep the cake in the refrigerator overnight for better flavor.


Chocolate Mouse Cake/巧克力慕斯蛋糕

IMG_3839

材料:

  • 4个鸡蛋
  • 砂糖 100克
  • 低筋面粉 80克
  • 牛奶 3大勺
  • 奶油30克
  • 可可粉20克
  • 朗姆酒一大勺
  • 柠檬汁/白醋一小勺

预热烤箱340度 烘烤时间30-40分钟。烤盘6寸。

做法:

1.开火把奶油融化到冒小泡关火加入牛奶混合, 慢慢的筛入可可粉。 搅拌到光滑无颗粒即可,加入朗姆酒搅拌均匀。

2.鸡蛋冷藏取出,蛋白蛋黄分开。蛋清放入干净无油的打蛋 盆里加入柠檬汁或白醋,像打戚风蛋糕一样打发蛋白。糖分三次加入将蛋白打发至硬性发泡,拉起打蛋头蛋白成尖峰状。

3.将蛋黄一个一个加入到打发好的蛋白里,等第一个蛋黄搅拌均匀后再放入下一个蛋黄,等加完全部的蛋黄后,高速打发大约3分钟,蛋糊成细密光泽状,提起打蛋头,观察蛋糊缓缓流下,滴下的蛋糊会保持同一姿势不会立刻散开就好。

4.低粉过筛入打蛋盆里,这时面粉在蛋糊上应该不会下沉。用切拌和从底部向上翻拌的手法,搅拌成无干粉的光亮糊状, 非常细腻。

5.取1/3面糊到巧克力溶液中,稍稍混合,再把巧克力混和物倒回在蛋糊里,继续搅拌均匀。

6烤模中喷点油,倒入巧克力面糊,在台面上顿几下烤模,震出气泡,放入烤箱中层,340度,30到40分钟。插入牙签拔出后光滑没有面糊即可。

做好的蛋糕放冰箱一两个小时就可以吃了。 我为了让它更好吃一点就加了些慕斯夹馅。

慕斯:

  • 1/4 杯) 熱水
  • 2 湯匙 無糖可可粉
  • 1/4茶匙即溶咖啡
  • 3/4杯 半甜的巧克力片
  • 1 杯 奶油
  • 1 湯匙糖


在一隻小碗,溶解可可粉和即溶濃咖啡粉在熱水裡。

在一個隔水鍋中,融化巧克力直到匀稠。關火,稍微冷卻。

在碗中用打蛋器攪拌濃奶油和糖直到硬态形式。

融化的巧克力和可可混合物攪拌。加入一半的奶油,攪拌后再加入剩餘的奶油,攪拌直至沒有白色的條紋。放入冰箱冷藏至蛋糕完全冷卻。

把蛋糕切成3等分, 在第一片蛋糕上均匀涂上奶油后放上第二片蛋糕然后依次操作。 把涂好的蛋糕放入冰箱冰几个小时后就可以吃了。

IMG_3832

Ingredients:

  • 4 eggs
  • Sugar 100 g
  • Cake flour 80 g
  • Milk 3 tablespoons
  • Heavy cream 30 g
  • Cocoa powder 20 g
  • Rum 1 tablespoon
  • Lemon juice/vinegar 1 teaspoon


Preheat the oven to 340F degrees; it is about 30-40 minutes of baking. 6-inch baking pan.

Direction:

  1. melt butter in a small pan then add milk and turn the heat of, slowly sifted cocoa powder into the mixture. Stir until smooth then add rum and mix.
  2. separate egg white and yolks in different containers. Egg white must be in a clean and oil free Bowl, add lemon juice or white vinegar to egg white and whip the egg white like how we make a chiffon cake. Add in sugar in three separate times, and whip until the egg white reach stiff peak form.
  3. Add the egg yolks one by one to the egg white, mix it every time you add the yolk, then whip at high speed for about 3 minutes, egg mixture will become really smooth, lift the egg mixture the egg batter will slowly drip, but the batter should stay the same position not spread out

Immediately

  1. sift the flour into the egg mixture but the flour will stay on top of the batter. Mix it from the bottom to the top, do not make circles, and the mixture will become light and fluffy, very delicate.
  2. take 1/3 of the egg mixture to the chocolate batter, mix slightly, then pour the chocolate batter back into the rest of egg mixture and continue to stir until mixed.

6 spray some oil in a pan, pour the batter to the pan, pounding the bottom of the pan on the counter a few times to make sure there is no more air in the batter. 340F degrees, bake for 30-40 minutes. After you insert a toothpick and it comes out clean the cake is ready.

Refrigerate for one or two hours the cake is ready to eat. I want it to taste even better so I add some mousse to the leyers.


Mousse:

  • 1/4 cup hot water
  • 2 Tablespoons sugar free cocoa powder
  • 1/4 teaspoon instant coffee
  • 3/4 Cup semi-sweet chocolate chips
  • 1 cup heavy cream
  • 1 Tablespoon sugar


In a small bowl, dissolve instant coffee powder and cocoa powder in hot water.

Melt the chocolate until smooth in a double water boiler. Turn off the heat, let cool.

Whisk heavy cream and sugar together until hard peaks formed.

Stir in cocoa mixture in melted chocolate. Add half of the cream stir and then add the remaining cream and stir until you don’t see any white streaks. Refrigerate until you are ready to make the cake.

Cut the cake into 3 equal slices, spread the mouse evenly on the first piece of cake the stack the second piece of cake on top of it AAthen repeat it until the cake is built. Refrigerate the cake for a few hours.


Papaya, White Fungus with Rock Sugar/冰糖木瓜雪耳

IMG_3760

冰糖木瓜雪耳

这是一道简单又营养的夏日饮品,冷热均可食用。 对于我来说更加好因为我连食谱都不用详细写。

白木耳一颗

莲子 半杯

百合1/4杯

木瓜 ½杯

以上除木瓜以外,洗净泡水过夜。

木瓜去皮切丁。

白木耳撕成小块, 莲子去苦芯加入百合, 适量的水放高压锅煮12 分钟(我用的是电高压锅)

等到可以打开盖后加入木瓜再煮3分钟

再次开盖后加入适量冰糖就可以了。

如果家里没有木瓜, 不用也可以。

This is a super easy and delicious summer dish. You can eat it hot or cold.

Dried White fungus one piece

Dried Lotus seeds ½ cup

Dried Lily Bulb ¼ cup

Papaya ½ cup

All the ingredients except papaya wash and soak in water overnight

Peel fungus into small pieces; pick the lotus seed’s bitter sprout out. Mix all the fungus, lotus seed, lily bulb with right amount of water and cook in an electronic pressure cooker for 12 minutes.

When all the pressure is gone, you can open the pressure cooker, add papaya and cook for 3 more minutes.

When you can once again open the pressure cooker add some rock sugar.

If you don’t have papaya at home, then it is ok to cook without it.


Noodles With Meat Sauce/炸酱面

IMG_3774

牛肉末半磅(80%瘦20%肥)

黄豆酱 3大勺

甜面酱 1.5大勺

水2/3 杯

糖1.5大勺

鸡粉1茶勺

干面 270克

姜蓉1茶勺

蒜蓉1茶勺

红萝卜丝少量

小黄瓜丝少量

鸡蛋2颗

鸡蛋打匀摊成鸡蛋饼后切丝

烧开一锅水后放入干面煮4-5分钟,捞起。

锅中加3大勺油放入姜,蒜蓉炒香。

加入牛肉末炒到肉变色后放入黄豆酱,甜面酱炒到酱和肉均匀混合。

加入水,糖后中火煮大概8分钟,出锅前加鸡粉。

面条盛在碗里,浇上肉酱, 加红萝卜丝,小黄瓜丝和鸡蛋丝。开吃!


Ground beef ½ pound (80% lean 20% fat)

Soy bean sauce paste 3 tbsps

Sweet sauce 1.5 tbsps

Water 2/3 cup

Sugar 1.5 tbsps

Chicken powder 1 teaspoon

Dry noodles 270 g

Ginger 1 teaspoon

Garlic 1 teaspoon

Shredded Carrot some

Shredded cucumber some

2 eggs

Whisk egg and make 2 thin egg pancakes and cut into shred.

Boil a big pot of water and cook the dry noodles for 4-5 minutes, drain.

Add 3 tablespoons of oil in a pan add ginger, garlic and stir fry until fragrant.

Add ground beef and cook until meat changes color, add soy bean sauce, sweet sauce and mix well.

Add water and sugar and cook about 8 minutes.

Noodles served in a bowl, pour meat sauce, add shredded carrot, cucumber and egg mix everything together. Eat!

IMG_3783

Oven Fried Chicken/烤箱版炸鸡

IMG_3797

1.

鸡1只(3磅)/切大块

蒜头2-3颗/切末

盐1.5茶勺

料酒1大勺

黑胡椒粉 1/2茶勺

2.

面粉1杯

盐少量

黑胡椒粉少量

辣椒粉少量

3

鸡蛋2只

牛奶1/3杯

将1中的鸡块与其他调料腌制过夜。

将面粉与2中的调料混合搅拌好

将鸡蛋和牛奶搅拌均匀

烤箱预热375F

在一不沾锅中加入少量油(沒过锅底就好)加热

将鸡肉逐一放入面粉中拌匀;再放入蛋液中裹上蛋液后放入面粉中裹上面粉,拿起弹掉多余的粉后放入油锅中每一面煎炸到浅金黄色。在一烤盘上放一张烤纸, 把煎过的鸡肉整齐的放在上面。

鸡肉全部炸好后, 放入预热好了的烤箱里。烤25 分钟后拿出翻个面再烤15分钟,或烤到鸡胸170F鸡腿180F就好了。

烤箱烤的鸡肉方便健康很多也不会搞到家里油烟味太大,但没有油炸的那么酥脆 好吃。 为了既健康又好吃,拌好粉后在油中煎炸一下外皮就很酥脆难后放烤箱烤一样方便健康。

pt2016_06_17_21_26_43

这次还自己做了蜂蜜芥末酱配鸡肉好吃到跳起。

蜂蜜芥末酱:

蜂蜜 2.5大勺

黄芥末酱2大勺

蛋黄酱6大勺

将以上材料搅拌均匀就是好吃的蜂蜜芥末酱了。 用这个酱来夹三明治也一定好吃。

IMG_3795


1.

1 whole chicken (3 pounds) cut into large pieces

2-3 cloves of garlic finely chopped

Salt 1.5 teaspoon

Cooking wine 1 tablespoon

Black pepper 1/2 teaspoon

2.

Flour 1 cup

Salt a pinch

Black pepper a pinch

Paprika a pinch

3.

2 Eggs

1/3 cup milk


Use all the ingredients in 1 to marinate chicken overnight.

Use all the spices in 2 mixes with flour

Egg and milk mix well


Preheat oven to 375F

Add a little bit of oil in a nonstick pan (just enough to cover the bottom) heat it up.

One by one mix the chicken chunks in the flour first; then put into the egg mixture to coat with egg, finally coat them with flour again.   Shake off the excess flour then pan fry each side until light golden brown. Place a sheet of parchment paper on a baking tray; neatly put fried chicken on it.


After all the chicken chunks are pan fried,  bake them in the preheated oven for 25 minutes then turn the chicken and bake another side for 15 more minutes, or until chicken breast is 170F and chicken leg is 180F.


Oven-roasted chicken is healthier and less grease for your kitchen, but not as crisp and tasty as fried one. Pan fry the chicken first then bake will make it both delicious and healthy.

Make your own honey mustard sauce with the chicken will make it even better.

Honey mustard sauce:

Honey 2.5 tablespoons

Yellow mustard 2 tablespoons

Mayonnaise 6 tablespoons

Simply mix everything together is the delicious honey mustard sauce. Use this sauce for sandwich will be a good idea too. Delicious!