Wonton With Chili Sauce/红油抄手

I make wontons quite often because it is easy and can be stored in the freezer for later when I don’t feel like to cook anything or when I am all out of idea what to eat. I used to work in Chinese restaurant for years, so making wonton is something easy for me. I can make 50 wontons in 10 minutes. It is getting hot recently, and I don’t feel like to eat wonton soup anymore so I make this wonton with chili sauce for summer time.

IMG_0665

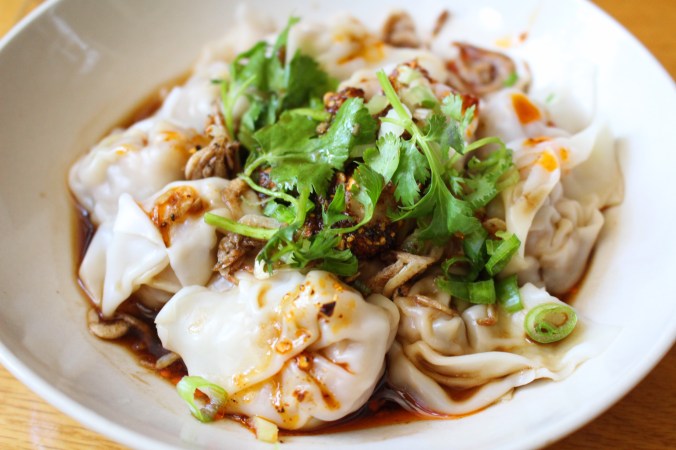
It is same way of wrapping wontons and cook the wontons in the boiling water just like when we make wonton soup. But after they are cooked, use a strainer to get them out of boiling water then add the chili sauce.

https://caiqinchen.com/2016/03/27/%e4%ba%91%e5%90%9ewonton/

Here is how to make the sauce:

Light soy sauce 1tbsp

Balsamic vinegar 1tbsp

Water 2 tbsps

Sugar 1tsp

Chicken bouillon 1/3 tsps

Hot oil 1-2 tsps

Mix everything above together and it is the sauce for wontons. It is for one serving about 12-15 wontons.

wechat-image_20180701174949.jpg

这是同样的方法包装馄饨和煮馄饨。但在煮熟后, 用漏勺把它们从沸水中捞出, 然后加入红油酱汁。

https://caiqinchen.com/2016/03/27/%e4%ba%91%e5%90%9ewonton/

下面是如何制作红油酱汁:

生抽1汤匙

香醋1汤匙

水2汤匙

糖1茶匙

鸡精 1/3 茶匙

红油 1-2 茶匙

把上面的东西混合在一起, 这是馄饨的调味汁。这是一份的量大约12-15 馄饨。

Bone In Rib-Eye Steak/战斧牛扒

IMG_0710.JPG

3 servings, $12 per serving (Steak only)

I went to Costco yesterday and saw this bone in rib-eye steak, I couldn’t resist the temptation, so I bought it home for today’s lunch. It was so tender and flavorful!!! I also made mashed potato and saute Chinese cauliflower, perfect Sunday lunch!

Bone in rib-eye steak 2.5 pounds

Rosemary 3 springs

Oil 2 tbsps

Butter 1-2 tbsps

One medium size onion (thin sliced)

Two shallot (thin sliced)

Marinate stead with fresh grounded pepper and Kosher salt. Make sure use enough salt and pepper because the steak is huge and thick. I used about 1 tbsp salt. Marinate the steak for at least 1 hour.

Preheat oven to 425F

Add oil and butter to a skillet and heat it up when it is really hot, add steak to the skillet and pan fry each side for about 2 minutes. (I even pan fry the sides too. )

Add rosemary and onion to the sides of  the steak when the steak is pan frying in the oil.

Roast steak  and the onion in the preheated oven for 13-15 per side.

Rest the steak for 10-15 minutes before serving.

WeChat Image_20180701170235.jpg

IMG_0699

IMG_0716

IMG_0689IMG_0700

3份, 每份12美元 (仅限牛排)

昨天我去了好市多, 看到这块带骨头的肋眼牛排, 我忍不住诱惑买了回来做今天的午餐。很多汁美味!!! 我还做了土豆泥和炒中国花椰菜, 完美的星期日午餐!

带骨肋眼牛排2.5 磅

迷迭香3条

油2汤匙

黄油1-2 汤匙

一粒中型洋葱 (切薄片)

两只葱 (切薄片)

用新鲜的黑胡椒和海盐腌牛排。一定要用足够的盐和胡椒粉因为牛排又大又厚。我用了大约1汤匙盐。将牛排腌至少1小时。

烤箱预热至425F

把油和黄油加到煎锅里, 当它很热的时候把牛排加到煎锅里, 每边煎2分钟。(我甚至把两边的边都煎了。)

当牛排在油煎的时候, 在牛排的两侧加入迷迭香和洋葱。

在预热的烤箱里烤牛排和洋葱13-15分钟每一面(要翻面)。

在上菜前先把牛排先放10-15 分钟再切。

Peanut Mochi/花生糯米糍

IMG_0650.JPG

I hadn’t eaten mochi for so many years. I believe for all those past 20 something years, this was my second time. The first time was in a Chinese restaurant and they gave us mochi as free dessert, but it wasn’t anything near good at all, I didn’t like it. As a little kid back in China, something made of sweet sticky rice was never my kind of food. I don’t know why I wanted to make this so bad this time, and it turned to to be so good and I ate almost all of them. Surprising!!! This is not Japanese style mochi, it is Fujianese mochi.

Ingredient:

Regular rice flour 1/3 cup

Glutinous rice flour 1 cup

Sugar 3tbsps

Peanut meal 1/2 cup

Water 1/2 cup

Direction:

Mix peanut and sugar together.

Mix 2 flours together, add water and mix until dough formed.

Roll the dough into thin long strip and cut it evenly to 16 to 20 pieces.

Roll each piece of dough round then cook them in boiling water for about 7-8 minutes until they all float to the top of the water.

Use a strainer to get all the balls out of water then drop them to the peanut sugar mix.

Roll the balls and make sure each piece wrap with enough peanut meal.

Tips:

You can add or subtract the sugar according to your own preferences. You can even adjust the proportion of  rice flours too, If you like the mochi softer, use more glutinous rice. If you like other flavors, you can use sesame meal, almond meal instead.

我很多年没吃糯米糍了。我相信在过去的20年里, 这是我的第二次吃。第一次是在中国餐馆, 他们给了我们糯米糍作为免费甜点, 但一点也不好吃。小时候在中国用糯米做的东西从来就不是我的菜。我不知道为什么这次我这么想做,而且好吃到我几乎一口气吃完了。令人 惊讶!!!这不是日式糯米糍, 这是福州人的做法。

成分:

普通粘米粉1/3 杯

糯米粉1杯

糖3汤匙

花生粉1/2 杯

水1/2 杯

做法:

把花生和糖混合在一起。

将2种粉混合在一起, 加入水和到粉团形成。

将粉团揉成长条, 均匀切成16到20个。

把每块粉团搓圆, 然后在沸水中煮7-8 分钟, 直到它们都浮到水上。

用漏勺把所有的球从水中取出, 然后把它们放到花生糖的混合物里。

滚一滚粉团,并确保每个都粘上足够的花生粉。

小贴士:

你可以根据自己的喜好添加或减去糖的量。你甚至可以调整米粉的比例, 如果你喜欢更软一点可以用多一点的糯米粉。如果你喜欢其他口味, 你可以用芝麻粉, 杏仁粉代替花生粉。

Chicken Feet in Chili Sauce/泡椒凤爪

IMG_0630.JPG

This is a very famous Chinese snack, it is a little spicy (can be very spicy though) and a little sour. Chinese love to eat it while chitchatting with friends or watering TV.

Chicken feet 13 pieces

Water 2 cups

Salt 1tbsp

Sugar 1.5tbsps

Vinegar 2tbsps

Rice cooking wine 4tbsps

Chicken bouillon 1.5tsps

Chinese chili in vinegar juice 6tbsps

Chinese chili in vinegar 20 pieces

Star anise 2 pieces

Ginger 5 slices

Chinese prickly ash1/2tsp

Jalapeno pepper 1/3 piece (optional)

Add salt, sugar, star anise and 3 slices of ginger to the 2 cups water and bring it to boil then turn the heat off, let cool. Once it is cool, add the rest of ingredients above except chicken feet to it.

Cut the nails off the chicken feet, then cut the feet in halves.

Add the feet to 5 cups cold water alone with 2 tbsps cooking wine and 2 slices ginger and bring it to boil. Turn the heat to medium low then continue to cook for 15 – 20 minutes.

Drain the water, rinse the feet with cold water then leave the feet in cold water until they are totally cool down about 15- 20 minutes.

Add the chicken feet to the sauce we just made and cover. Leave it in the refrigerator over night.

鸡爪13只

水2杯

盐1汤匙

糖1.5汤匙

醋2汤匙

米酒4汤匙

鸡精1.5茶匙

中国泡椒汁 6汤匙

泡椒20粒

八角茴香2颗

姜5片

花椒1/2茶匙

墨西哥辣椒1/3 只 (可选)

加盐, 糖, 八角和3片生姜到2杯水里煮开然后关火, 让它凉下来。然后加入以上除了鸡爪以外所有材料 。

把鸡爪上的指甲剪掉, 然后切成两半。

将鸡爪加到5杯冷水中, 加2汤匙的料酒和2片生姜, 将其煮沸。然后把火转到中火继续煮 15-20 分钟。

鸡爪捞出用冷水冲一冲, 然后将鸡爪放在冷水中, 直到完全冷却约 15-20 分钟。

把鸡爪加入我们刚做好的酱汁里。把它放在冰箱里过夜。

Sweet Sticky Rice wrapped In Bamboo Leaves/红豆红枣椰奶粽子

IMG_0622.JPG

9 servings $0.35 per serving.

I am not a big fan of ZongZi, when I was little I didn’t eat it at all because I hated the smell of Potassium carbonate & sodium bi-carbonate solution (baking soda). Back then we usually made it with sticky rice and peanuts with a lot of baking soda. It had no taste at all but the smell of the baking soda was awful. Since I came here, I saw people making different flavor Zongzi, some savory with meat and whole lot of other ingredients and some sweet ones. I was fascinated, so I started making it myself in hope of making something I will like too. I’ve tried at least 5, 6 different ones. This is the latest invention. Sweet, red bean, dates with coconut milk flavor. Yummy! It has the slightly coconut flavor at the end of each bit, the big Chinese dates give it the unit sweet flavor plus the soft texture of the red bean with the sweet rice. It is a perfect combination! I do eat Zongzi now even though I am still not a big fan of it, but this one I will continue to make every year!

IMG_0580

2 cups sweet sticky rice

7 oz. coconut milk

9 Chinese big size date

1/3 cup red bean

1/3 cup sugar

18 pieces Bamboo leave

Soak Bamboo leaves in water for 2-3 hours, then wash them clean.

Wash rice, drain all the water. Dissolve sugar in the coconut milk, then soak rice in coconut milk over night.

Soak red bean in water for 4-5 hours, cook them until tender. I cooked them in my pressure cooker for 8 minutes.

Make sure to drain the excess coconut milk before you start wrapping.

Here is the link how I wrap them. There are different way of doing it, as far as you can wrap them without leaking, then you are good to go!

https://caiqinchen.com/2015/06/14/sweet-rice-wrapped-in-bamboo-leaves%e7%b2%bd%e5%ad%90/

Cook them in pressure cooker for 25-30 minutes.

IMG_0588

The savory ones

IMG_0592

9个甜粽子,每个0.35美元

我一直不怎么喜欢粽子, 我小的时候, 我根本就不吃, 因为我讨厌鹼水的味道。那时我们通常用糯米和花生加很多鹼水做的。它没有什么味道, 但鹼水的味道让我退避三舍。自从我来到美国后, 我看到人们居然做不同口味的粽子, 有些是肉类做的咸味的有些甜的。我感覺很新奇所以我就开始包一些不同口味的希望能有那么一两种我自己会喜欢。我试过至少 5, 6 个不同的口味。这是最新发明:甜红豆红枣椰奶风味。美味!每一口都有少许椰子味, 大枣的特殊甜香味加上软松的红豆与糯米。这是一个完美的组合!我现在也吃粽子了, 尽管我还不是很喜欢吃, 但这个新口味我会继续做下去!

2杯糯米

7盎司椰奶

9个大枣

1/3 杯红豆

1/3 杯白糖

18片粽叶

将粽叶浸泡在水中2-3 小时, 然后清洗干净。

米洗干净把所有的水都篦干。糖在椰奶中溶解, 然后用椰奶浸泡大米过夜。

将红豆浸泡在水中4-5 小时, 煮至软。我的在压力锅里煮了8分钟。

在开始包之前, 一定要把多余的椰奶篦出。

下面是我包粽子的链接。有不同的方式包它, 只要你可以包好不漏就都可以。

https://caiqinchen.com/2015/06/14/sweet-rice-wrapped-in-bamboo-leaves%e7%b2%bd%e5%ad%90/

在压力锅里煮25-30 分钟。

Lobster Over Sticky Rice/糯米龙虾


I made steam lobster with sticky rice the other day. It is the same way how I made steam crab with sticky rice. The flavor was super delicious!!! The only difference is I added diced taro this time. It added another layer of flavor to the sticky rice. Steam taro over water separately before hand, then add to the rice, followed by lobster.

IMG_0429.JPG

6 servings, $5.00 per serving.


Here is the link to the crab sticky rice:

https://caiqinchen.com/2016/02/10/crab-over-the-sticky-rice%e7%b3%af%e7%b1%b3%e8%9f%b9/

IMG_0408

IMG_0413

Ginger&Scallion Lobster/姜葱龙虾

IMG_3271

3 servings, $6.00 per serving.


Lobster 2 pounds

Ginger 35g (thin shred)

Scallion 4-5 whole pieces (thin shred)

Half small yellow onion (thin shred)

Cut the lobster into small pieces.

Drain the water out, then add 4-5 tbsps corn starch to the lobster and mix well.

Deep fried lobster in hot oil about 4 minutes, make sure only a few pieces at a time, we want to keep the oil hot.

After all the lobster are deep fried, set aside.

Leave only 2 tbsps oil in the cooking pan, add scallion, ginger and onion to the oil and stir fry for 2 minutes.

Add the lobster back to the pan and mix with the vegetables, sprinkle 1/3 tsp salt, 1/3 tsp black pepper, 1tsp sesame oil and 2tbsps Chinese cooking wine to the pan and mix.

IMG_0460

IMG_3264.JPG

3份,每份$6.00

龙虾2磅

生姜 35克 (切细丝)

葱4-5 整条 (切细丝)

半小黄洋葱 (切细丝)

把龙虾切成小块。

将水篦出, 然后将4-5 汤匙玉米淀粉加入龙虾, 拌匀。

龙虾在热油中油炸大约4分钟, 每次只炸几块,我们要保持油温。

所有的龙虾都炸完以后, 剩2汤匙油在煮锅里, 加葱、姜和洋葱油炒2分钟。

把龙虾放回锅里拌一下, 洒1/3 茶匙盐, 1/3 茶匙黑胡椒, 1茶匙 香油和2汤匙料酒拌匀。

IMG_0462

没有吃完的龙虾,我把肉挖出来切小了炒饭也是一级棒哦!

I didn’t finish all of the lobster, so the next day, I cut the lobster meat into smaller pieces and made myself some lobster fried rice, it was crazily good too!

IMG_0465.JPG


Soy Sauce Chicken/豉油鸡

IMG_0521

3 servings $3.00 per serving.

I made this dish in the morning today. I read so many recipes last night and I didn’t know which one to choose from so I decided to make my own version of it. It turned out to be a great delicious and easy dish. My mother complained it was too delicious so she ate more than she was supposed to. Lol…

Half Chicken about 2 pounds

water 1 cup

Light soy sauce 1/4 cup

Mushroom flavored dark soy sauce 3tbsps

Rock sugar 25g

Ginger 3 slices

Garlic 1 clove

Scallion 2-3 pieces ( whole scallion)

Bring some water to boil, then add the whole half chicken to the water, take it out after 20 seconds, rinse it with cold water or add it to ice cold water right away.

Take the chicken out of the cold water after a minute or so and repeat the procedure one more time( hot then cold). The purpose of doing this is to make the chicken skin more Elastic.

Add one tbsp oil in a cooking pan, add ginger, garlic and scallion to the oil and saute for 30 seconds.

Add the rest of sauce ingredients and bring the whole thing to boil then continue to boil for 2 minutes.

Add chicken to the sauce, then reduce the heat to medium and cook with a lid on for 10 minutes.

Turn the chicken to the other side and continue to cook with a lid on for 7-8 minutes. Turn the heat off.

When it cools down, cut and serve.

Tips:

You can dip the chicken with the sauce we just cook the chicken with. The reduced sauce now is very delicious and you can use it to make fried rice or mix it with noodles. Yum! Try to buy fresh chicken instead of defrost one. You will know the differences when you try it. The soy sauces are very important to the final result too. Below are the soy sauces I used for this dish.

WeChat Image_20180612214728

3 份,每份$3.00

今天早上我做了这道菜。昨晚我找了很多食谱, 我不知道该选哪一个, 所以我决定做我自己的版本。结果成品美味的不得了还很简单。我妈妈抱怨它太好吃了, 所以她吃得比她想象的要多很多。哈哈哈。。。。。。

半只鸡约2磅

水1杯

味极鲜1/4 杯

草菇老抽3汤匙

冰糖25克

姜3片

大蒜1粒

葱2-3 条 (全葱)

锅里放些水煮沸, 然后把整个半鸡肉加到水里, 20 秒后取出, 用冷水冲洗, 或者马上加入冰冷水中泡。

一分钟左右把鸡肉从冷水中取出, 再重复一次 (热+冷)。这样做的目的是使鸡皮更具弹性。

在锅里加一汤匙油, 加姜、蒜和葱油, 炒30秒。

添加其余的调味料汁, 并煮沸, 然后继续煮2分钟。

在调味汁中加入鸡肉, 然后将火调到中火, 加盖子煮10分钟。

把半鸡转一边, 继续盖盖子煮7-8 分钟。熄火。

当它冷却下来后切块就可以吃了。

技巧:

你可以用煮鸡肉的酱汁蘸鸡肉。煮完后的酱汁是非常美味的, 你可以用它来做炒饭或拌面。尽量买新鲜的鸡肉, 而不是解冻的。酱油的品质对最终的结果也很重要。上面是我用来做这道菜的酱油。


Fruit Ice Bars/水果冰棒

IMG_0529

I saw someone else was making this fruit ice bars, and she made them look so colorful and delicious! I couldn’t wait to make some for myself too. Here they are: mango strawberries and yogurt ice bars. It is so easy even a cave man can do it. : )

I don’t think any kind of fruit can be used to make this, it has to be some sort of creamy texture fruits like berries, mango or something juicy like water melon.

I used mango, strawberries and plain yogurt. If you want to be healthy like me, don’t add anymore sugar to the fruit puree, or you can add sugar, honey as you may like. Also you’re free to choice any other kind of yogurt, you don’t have to stick with plain one. But I was very happy with mine. I pureed some mango and strawberries(separately of course), then layered them in the ice bar boxes with my favor plain yogurt, then put them in freezer overnight.  My mother thinks it is not sweet enough, but I love it just the way it is.

Imagine in a hot hot hot summer day and you make some of these, and you can enjoy it without any guilt! I can’t wait to make some  more with other fruits! Oh, don’t forget to invite you children to “help” you make some, they will want to eat more!!!

IMG_0525

我看到其他人在作这个水果冰棒, 她把冰棒做的五彩缤纷又美味!我迫不及待也做了一些。这些是: 芒果草莓和酸奶冰棒。这个容易到一个远古的洞穴人都会做。: )

我不认为任何一种水果都可以用来做这个, 必须是一些口感比较滑比较绵柔的水果, 比如浆果, 芒果或一些汁水比较多的如西瓜。

我这次用芒果, 草莓和普通酸奶。如果你像我这样提倡健康就不要再添加糖到水果浆里, 或者你可以加糖, 蜂蜜, 你喜欢就好。你也可以选择任何其他类型的酸奶。但我很喜欢我自己做的。我把一些芒果和草莓打成泥(当然是分开打的), 然后加我喜欢的纯酸奶把他们分层加入冰棒盒里, 然后放在冰箱里过夜。 我妈妈认为它不够甜, 但我喜欢。

想象一下在炎炎夏日, 你做了一些五颜六色的冰棒, 你可以多吃没有任何内疚!我迫不及待地想用其他的水果做更多!哦, 别忘了邀请你的孩子 “帮助 ” 你做一些, 他们会想吃更多哦!!!

Mango Tapioca/芒果西米露

IMG_0433

This is something really delicious and easy to make, only it will take sometime time to prepare.

Chinese purple sticky rice 1 cup

Small tapioca Pearl 1/2 cup

2 big strawberries

1 mango

Coconut milk 2/3 cup

Coconut flavor Sugar 1/3 cup

Wash rice and cook it in a electronic pressure cooker for 18 minutes with 3 cups water.

Bring 2 cups water to boil then add tapioca, turn the heat off and leave it for 30 minutes with a lid on.

Drain the water from tapioca then add 2-3 more cups fresh cold water and start cooking again. At this point, the center of tapioca is still white, by the time the water is boiling again, the white in the center will disappear. when the white is totally disappear, turn the heat off and drain most of water.(depend on how thick do you want your dessert to be, don’t make it too thin though)

Add coconut milk and coconut sugar and bring it to boil again. (adjust the amount of  coconut milk and sugar according to your own preferences)

This dessert can be served hot or cold. If you want to eat it cold (more common) you should cook it with a little more water because it will absorb water while it cools down.

Scoop some purple rice by using a ice cream scoop and add it to tapioca, garnish it with strawberries and mango.

IMG_0447

这是一道很好吃的甜点, 很容易做, 只是需要一些时间来准备。

中国紫糯米1杯

木薯西米1/2 杯

2个大草莓

1个芒果

椰奶2/3 杯

椰味糖1/3 杯

清洗糯米, 用电压力锅加用3杯水煮18分钟。

2杯水煮沸, 然后加入西米, 关火盖盖子静置半个小时。

将水从木薯中篦出, 再加2-3 杯新的冷水, 再开始煮。此时, 木薯的中心仍然是白色的, 当水再次煮开时, 中间的白色就会消失。当白色完全消失, 关火并篦掉大部分水。(取决于你希望你的甜点有多稠, 当然也不要让它太稀)

加入椰奶和椰子糖, 再次把它煮沸。(根据您的喜好调整椰奶和糖的量)

这道甜点可以冷吃或热吃。如果你想吃冷的 (更常见), 你应该多加一点水煮, 因为它冷却下来会吸收很多水。

用冰淇淋勺舀一些紫糯米加入西米中, 用草莓和芒果点缀。